PowerPoint - Template building: Basics
PowerPoint templates in primedocs are made up of a number of different template types:
- The primedocs Master Template - which contains the basic configuration of the PowerPoint template. This Master contains only slide layouts and if you have imported a presentation, you should clear (delete) all content slides.
- The (content) template itself - This contains the actual content slides which should automatically be part of the presentation when the user creates a new presentation.
- The slide set template - This contains content slides which can be added automatically to the presentation after creation, and which are available via “Insert Slide”.
- The table of contents – This template type is used to design the table of contents, which can be inserted into the presentation via ‘Table of contents’.
- The image gallery – All corporate design images are stored and can be accessed in the presentation.
- The diagram template – This determines which diagrams are available in the presentation.
The first step in creating a primedocs PowerPoint template is the creation of a standalone PowerPoint template. This regular template can be independently tested and is a regular PowerPoint - however, it makes sense to bear in mind certain layout-relevant topics which will be a part of the primedocs template later. One typical example of this is the handling of the slide footer, which is managed differently from the PowerPoint standard.
Make sure you save your changes and synchronise your client from time to time so that any changes are communicated to the server!
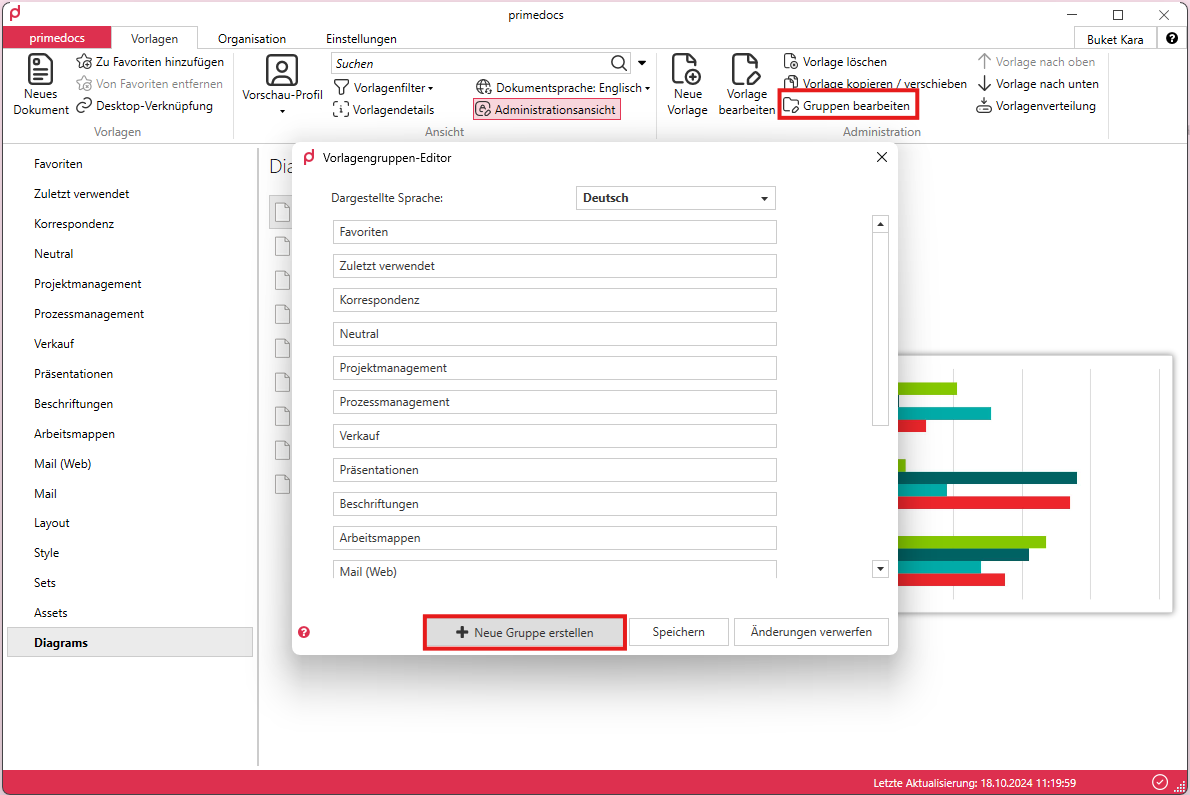
Groups - Creating and setting up
To get a clear overview, first click on ‘Edit groups’, which will appear in the top left-hand corner of your client after activating the administration view.
Create the following groups (the names are examples and can be renamed)
- Presentations
- Sets (or slide layouts)
- Assets (or image gallery)
- Diagrams (or charts)
Master template: Creating and setting it up
New template - Master
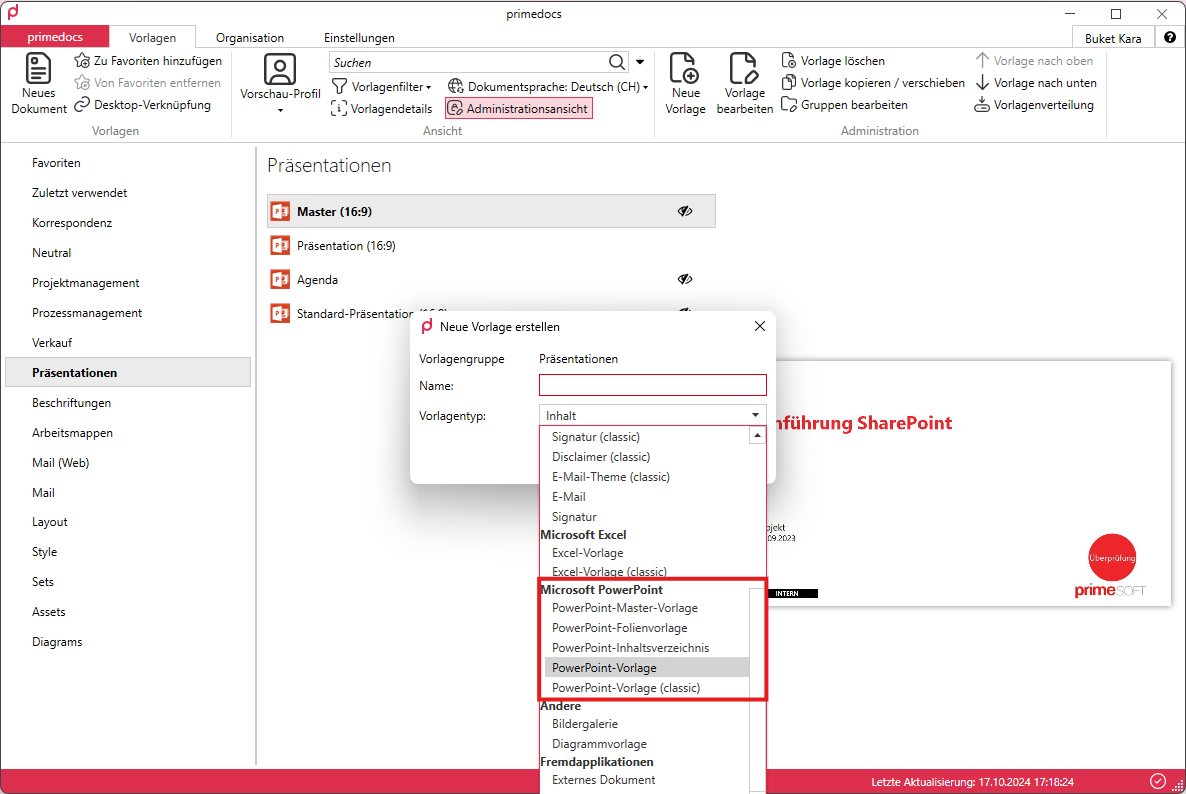
Once this standalone template has been tested and finalised, go to the administrator view and select ‘New Template’, give the new template a name, and then select the type of PowerPoint template you want to set up from the Template Type drop-down menu. You will start with a ‘PowerPoint Master Template’ in the Microsoft PowerPoint category category (if it does not already exist).
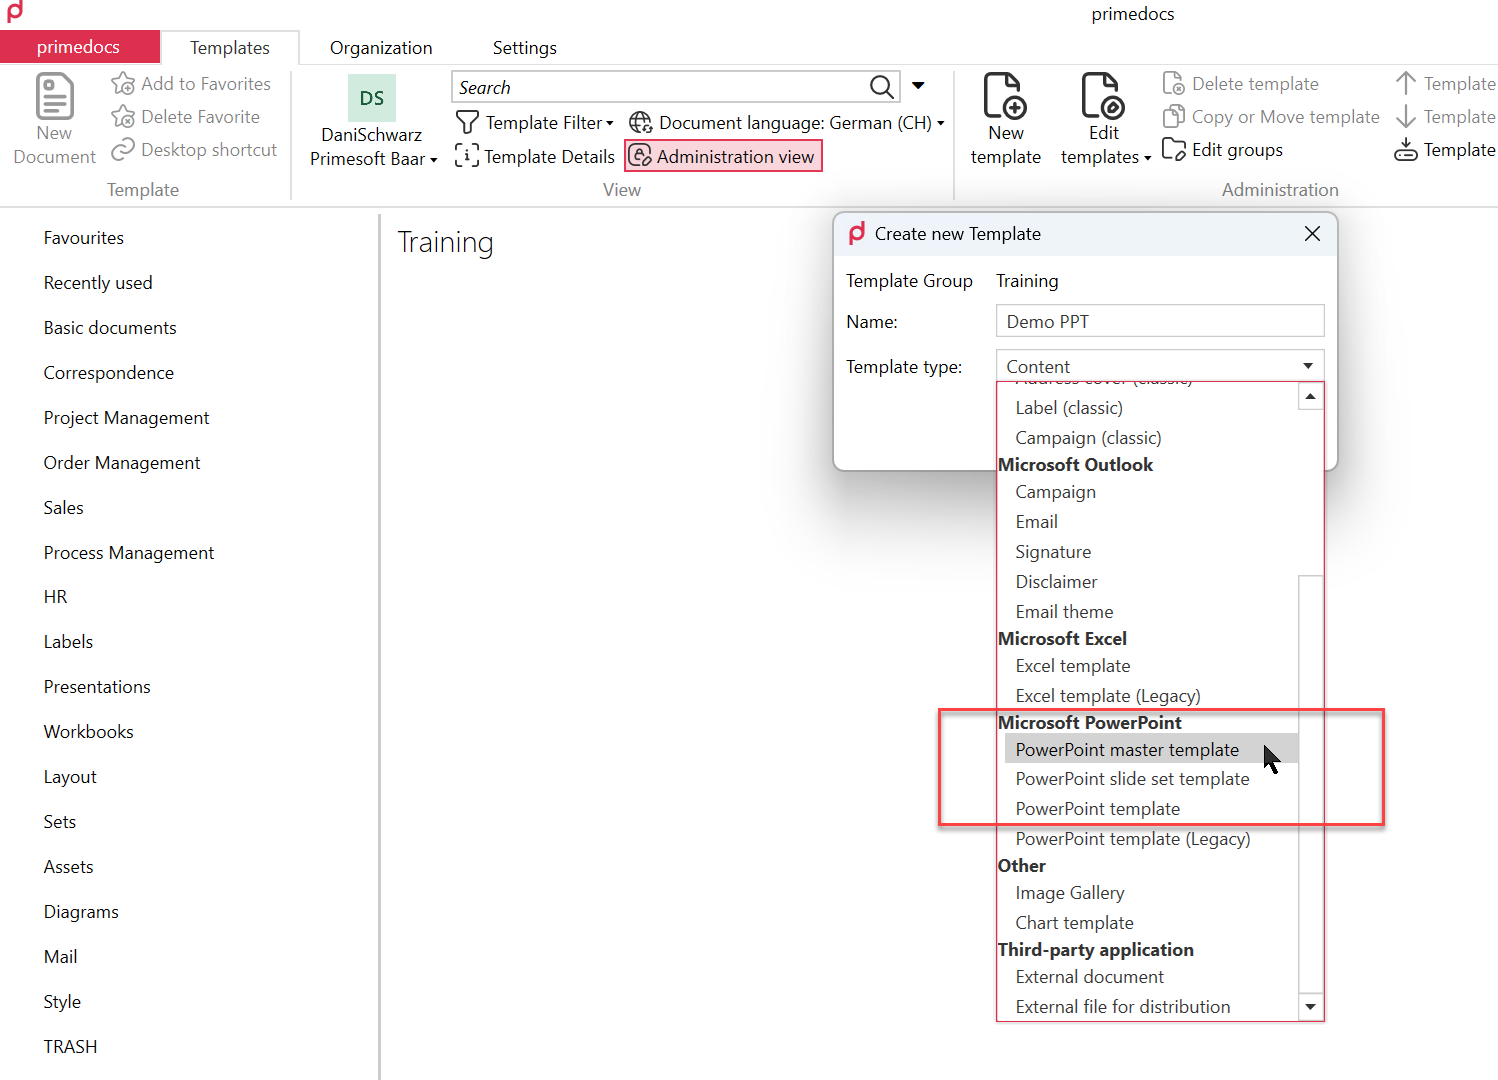
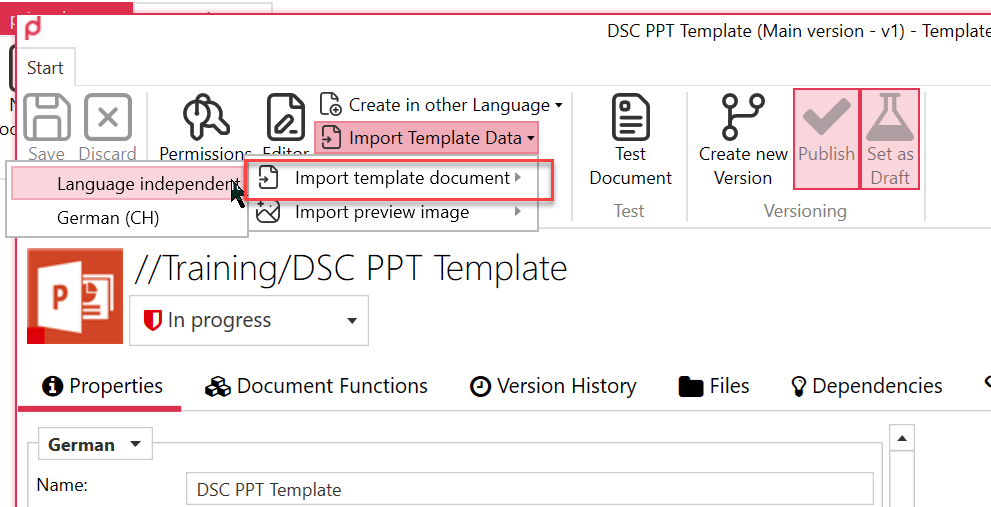
Edit and import template
Once this is available, go to the ‘Edit Template’ window and import the standalone template file you have created. Delete any content slides that may have been imported with the master template. The primedocs master template (pd Master) should be empty. If you do not have a ready-made PowerPoint template, you can also recreate your master layouts directly in the editor if necessary.
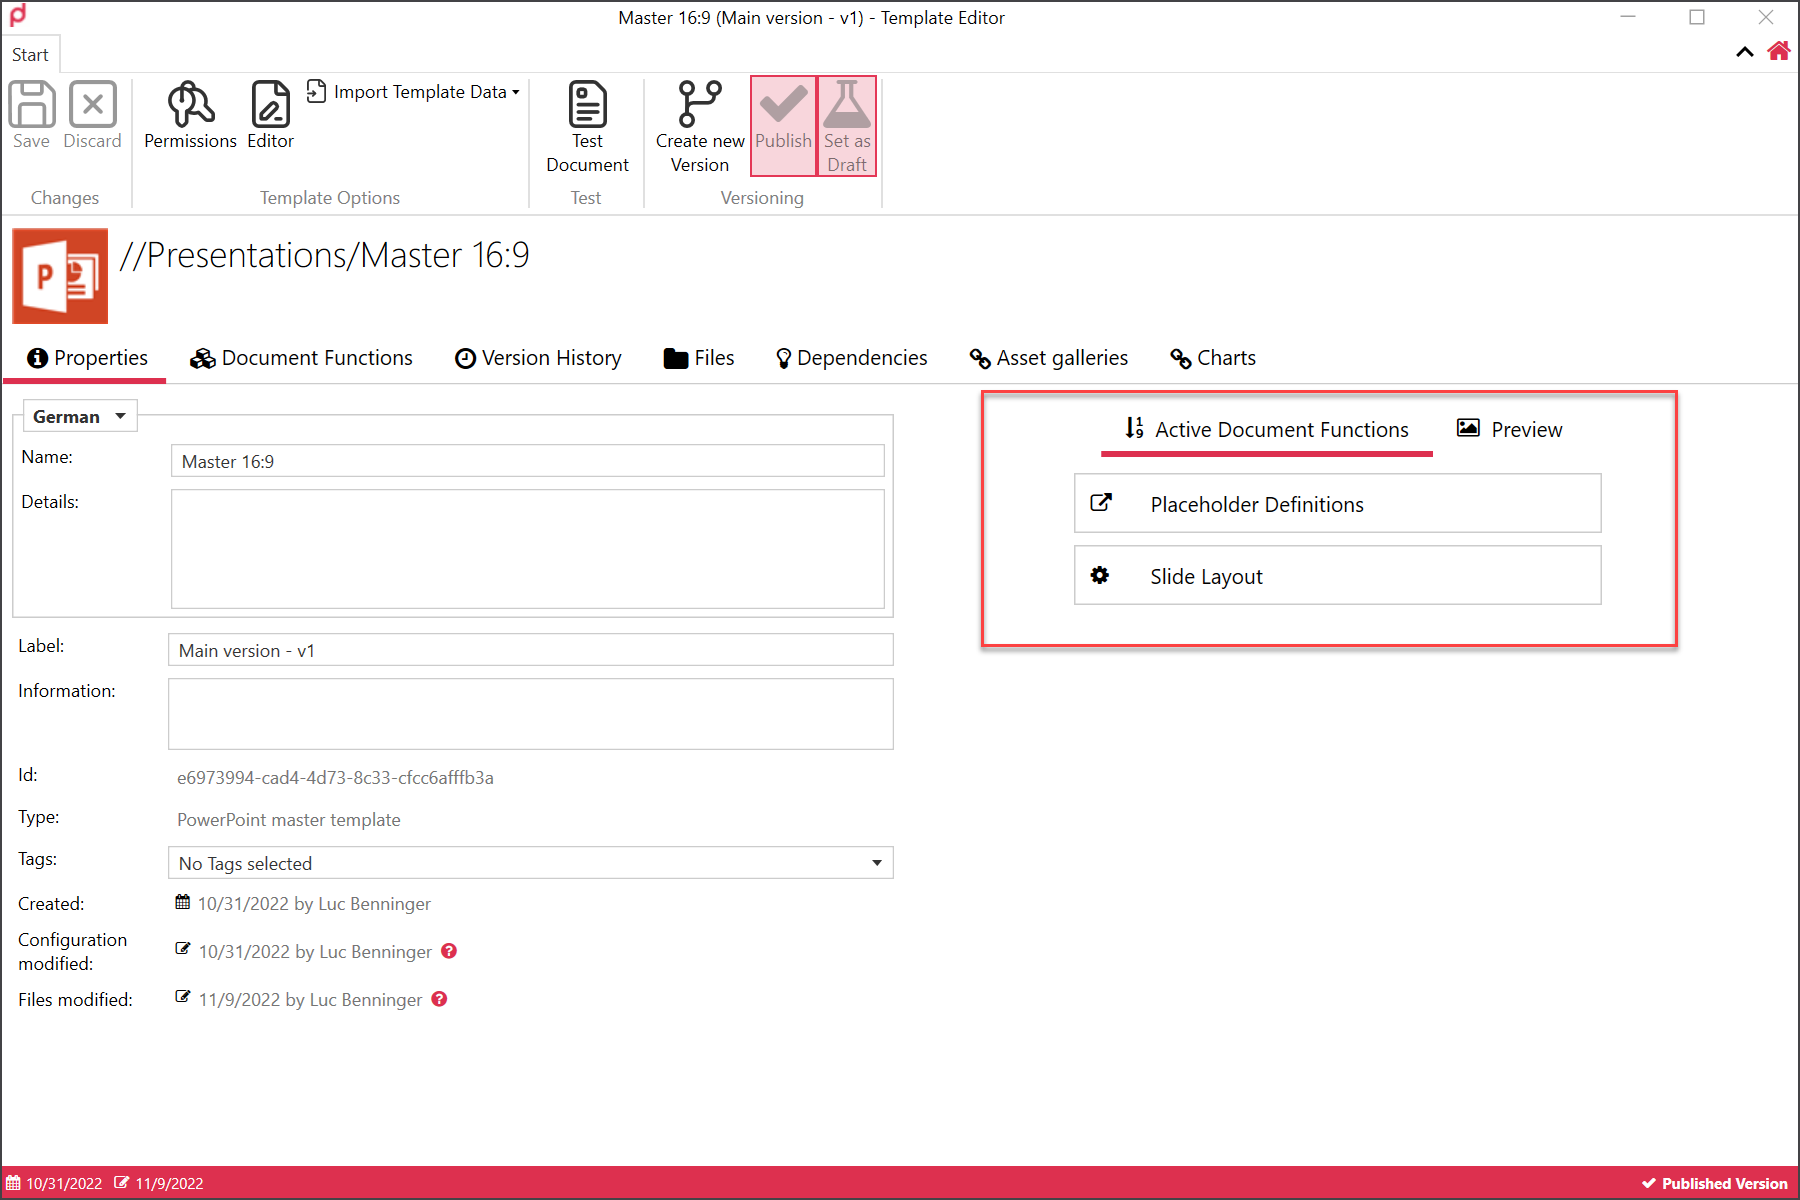
Document functions
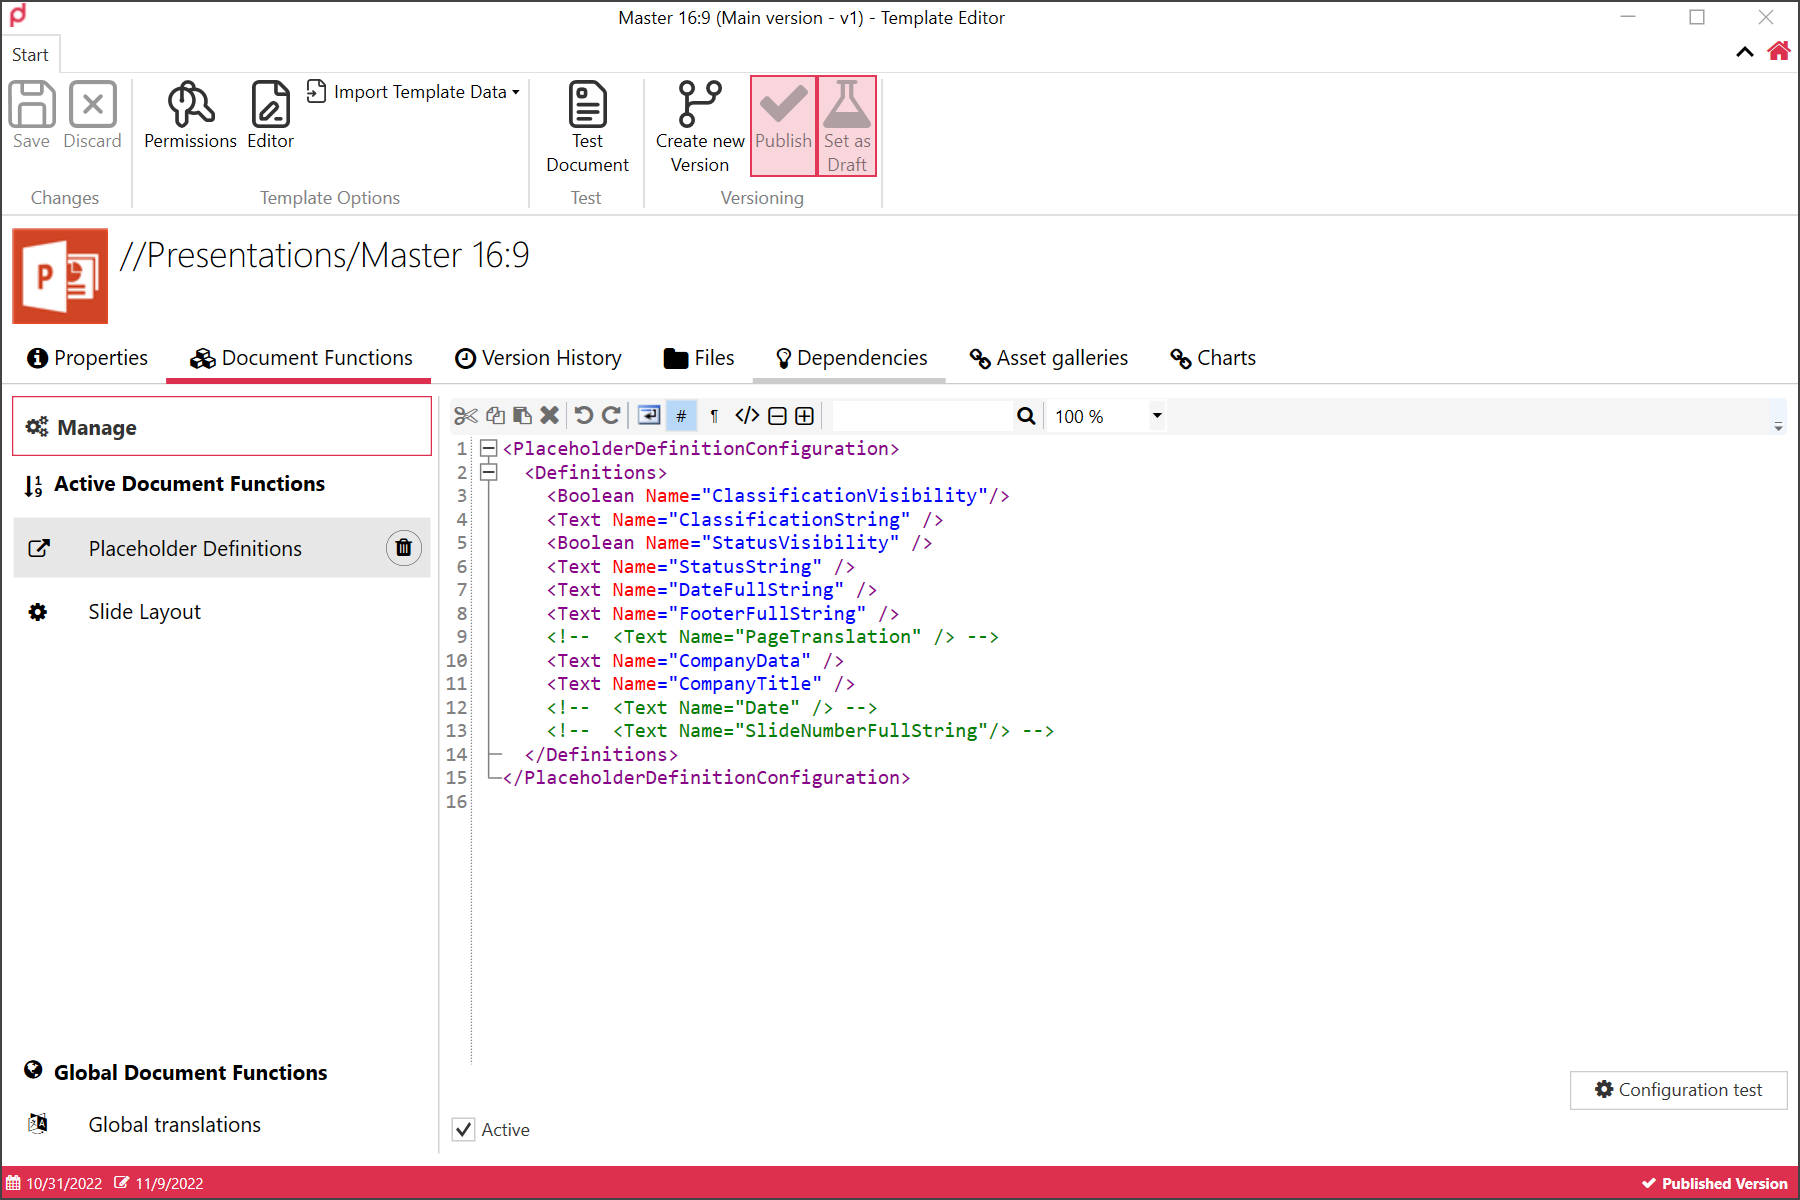
Once the pd Master has been populated, switch to the Document Functions tab and activated the two document functions “Placeholder Definitions” and “Slide Layout”. They will then appear on the right on the main “properties” page as follows:
Placeholder definitions
In the Placeholder Definitions, you can declare the placeholder fields that you intend later to place onto your slides, so that these can be populated by and linked to fields in the data entry form that appears when you create a new presentation. More on this later. This is an example of a set of such fields:
Boolean (YesNo)
‘YesNo’ are field declarations for a later check box with the status selected (true) or not selected (false).
Text
“Text” will later be text entry fields. Note that these field definitions will be available to all presentation templates which are based upon this master - but not every presentation template needs to use all the fields.
ℹ️ Info Further information on the elements can be found here:
Code
Slide layout
The Slide Layout document function lists the slide layouts that this pd Master will contain - and these (for the timebeing) need to be added manually:

DisplayName
The ‘DisplayName’ determines the layout name that is displayed in the primedocs function in the generated presentation under ‘Slides’. For multilingual template solutions, the layout name can be translated using ‘translate-DisplayName’. For the translation to take place, the translation must be stored via ‘global translations’ and specified under ‘translate-DisplayName’.
Name
The master layout name is specified under ‘Name’. This allows primedocs to recognise which layout is involved.
PreviewAsset (optional)
You can create a separate image gallery containing the preview images for each layout that are used with the primedocs ‘Change layout’ function. If the ‘PreviewAsset’ element is omitted, primedocs creates its own preview images without content based on the pd master.
AssetFilter
The ‘AssetFilter’ determines whether this slide layout has access to the image gallery and, if so, to which folder or image. The entire image gallery or individual images can be released for the slide layout.
DesignConversionMappings
DesignConversionMappings defines the names of the layouts from the possible input presentation that will be migrated to the pd presentation. Each layout is given its appropriate layout name, which is taken into account during conversion. Multiple entries can be made, which are specified per line with <Name>(Layout name)</Name>. The name of the layout of the new presentation can also be listed. It should be noted that each name is only mentioned once so that it is clear during conversion which layout is being converted to which layout.
IsDesignConversionFallBack
There is also an option for ‘IsDesignConversionFallBack’, which specifies the layout to be used if the slide migration is unable to automatically assign an existing slide layout to a layout in the pd master. It is important to note that only one layout is assigned this element.
This concludes the initial setup of the pd Master.
Content template: Creating and setting it up
The template file (which is what the end users will see) contains those content slides which will be opened when the user creates a new presentation.
New template - Content
Now, in primedocs, in the Administrator view, create a new template, and this time, select “PowerPoint Template”.
Edit and import template
Be careful here and make sure that the “Based on” field is correctly filled in. Point this template to the pd Master you created previously.
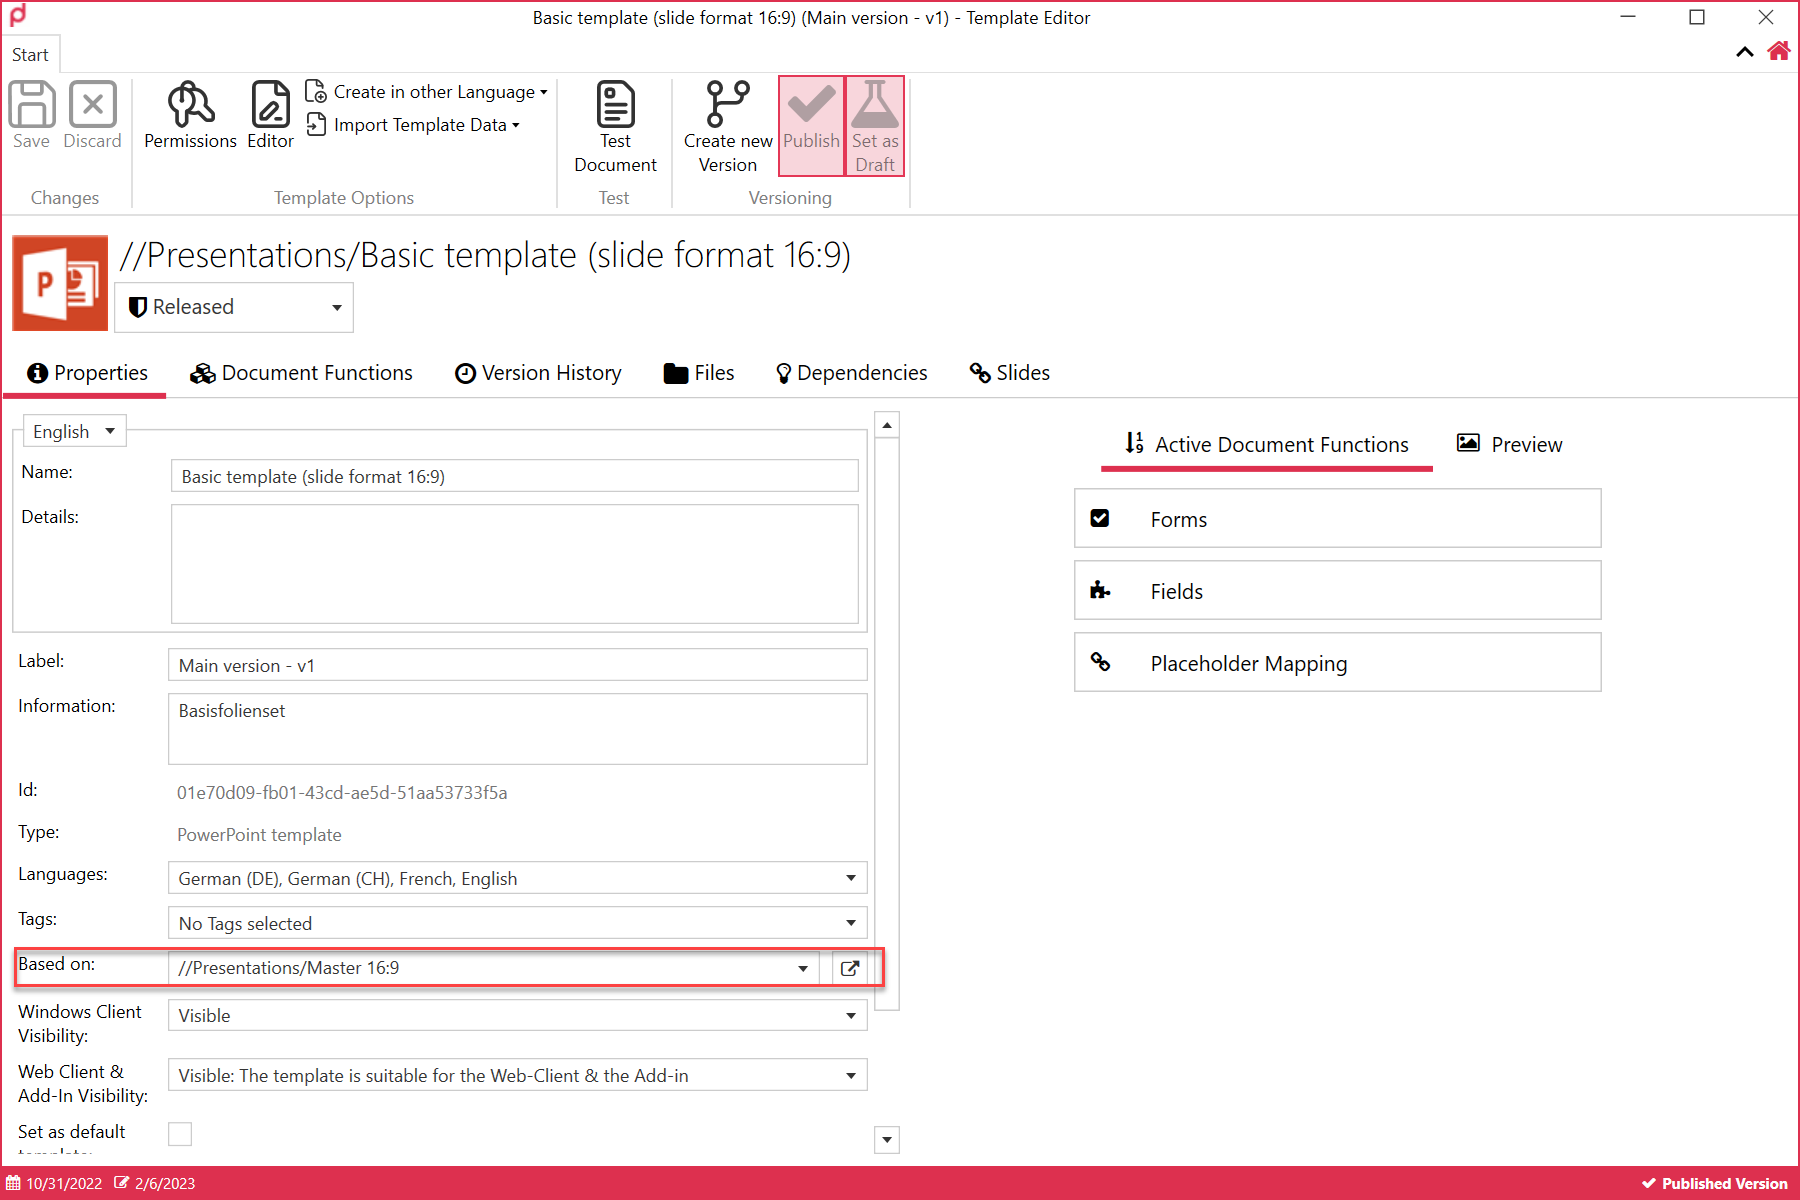
If this field is left blank, the standard PowerPoint master layouts will be assigned.
In order for a content template to appear under Files, which will be necessary at a later point in time, it must be opened and saved once using the editor. If a slide is displayed incorrectly, it can be deleted or replaced.
Document functions
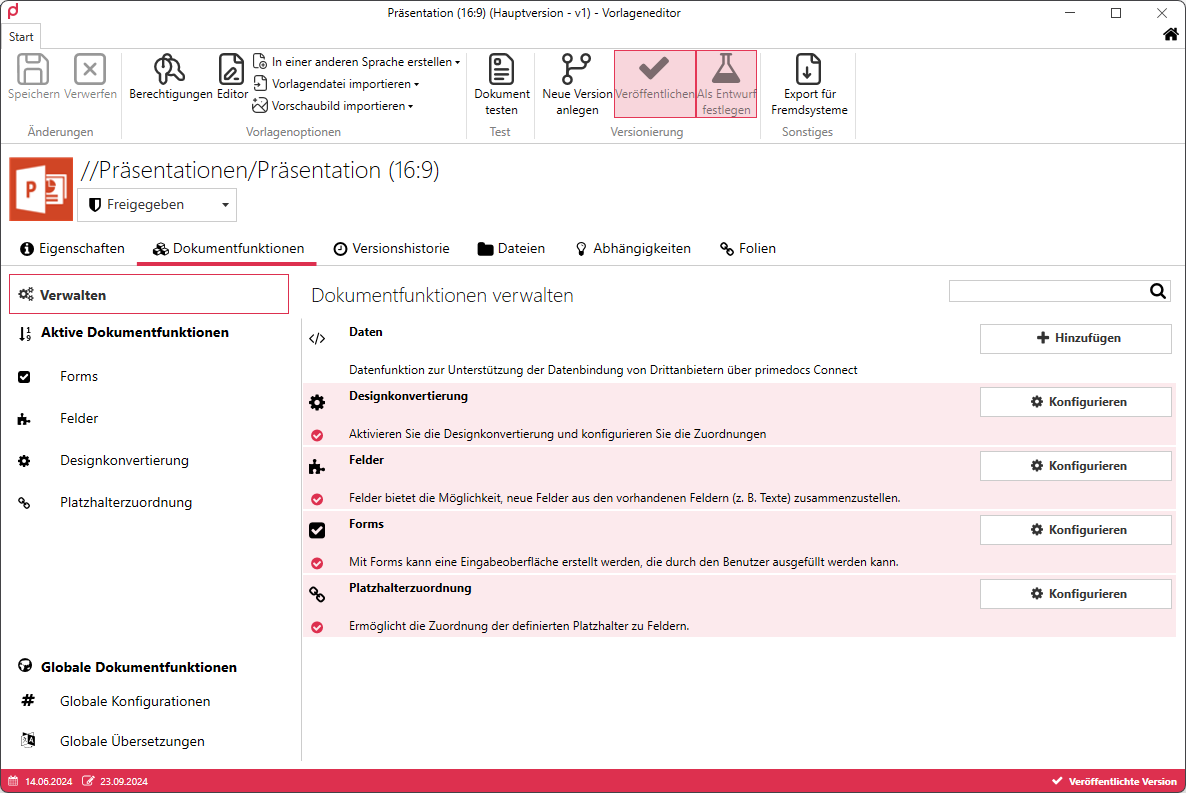
Now go to the document functions and activate all the functions you need, such as ‘Forms’, “Fields”, ‘Placeholder Mapping’ and ‘Design Conversion’. In this example, these four functions are used.
Placeholder Mapping
Placeholder mapping links fields that were specified in the master template under the document function Placeholder Definition.
Detailed information can be found in the following chapter of the technical documentation:
Code
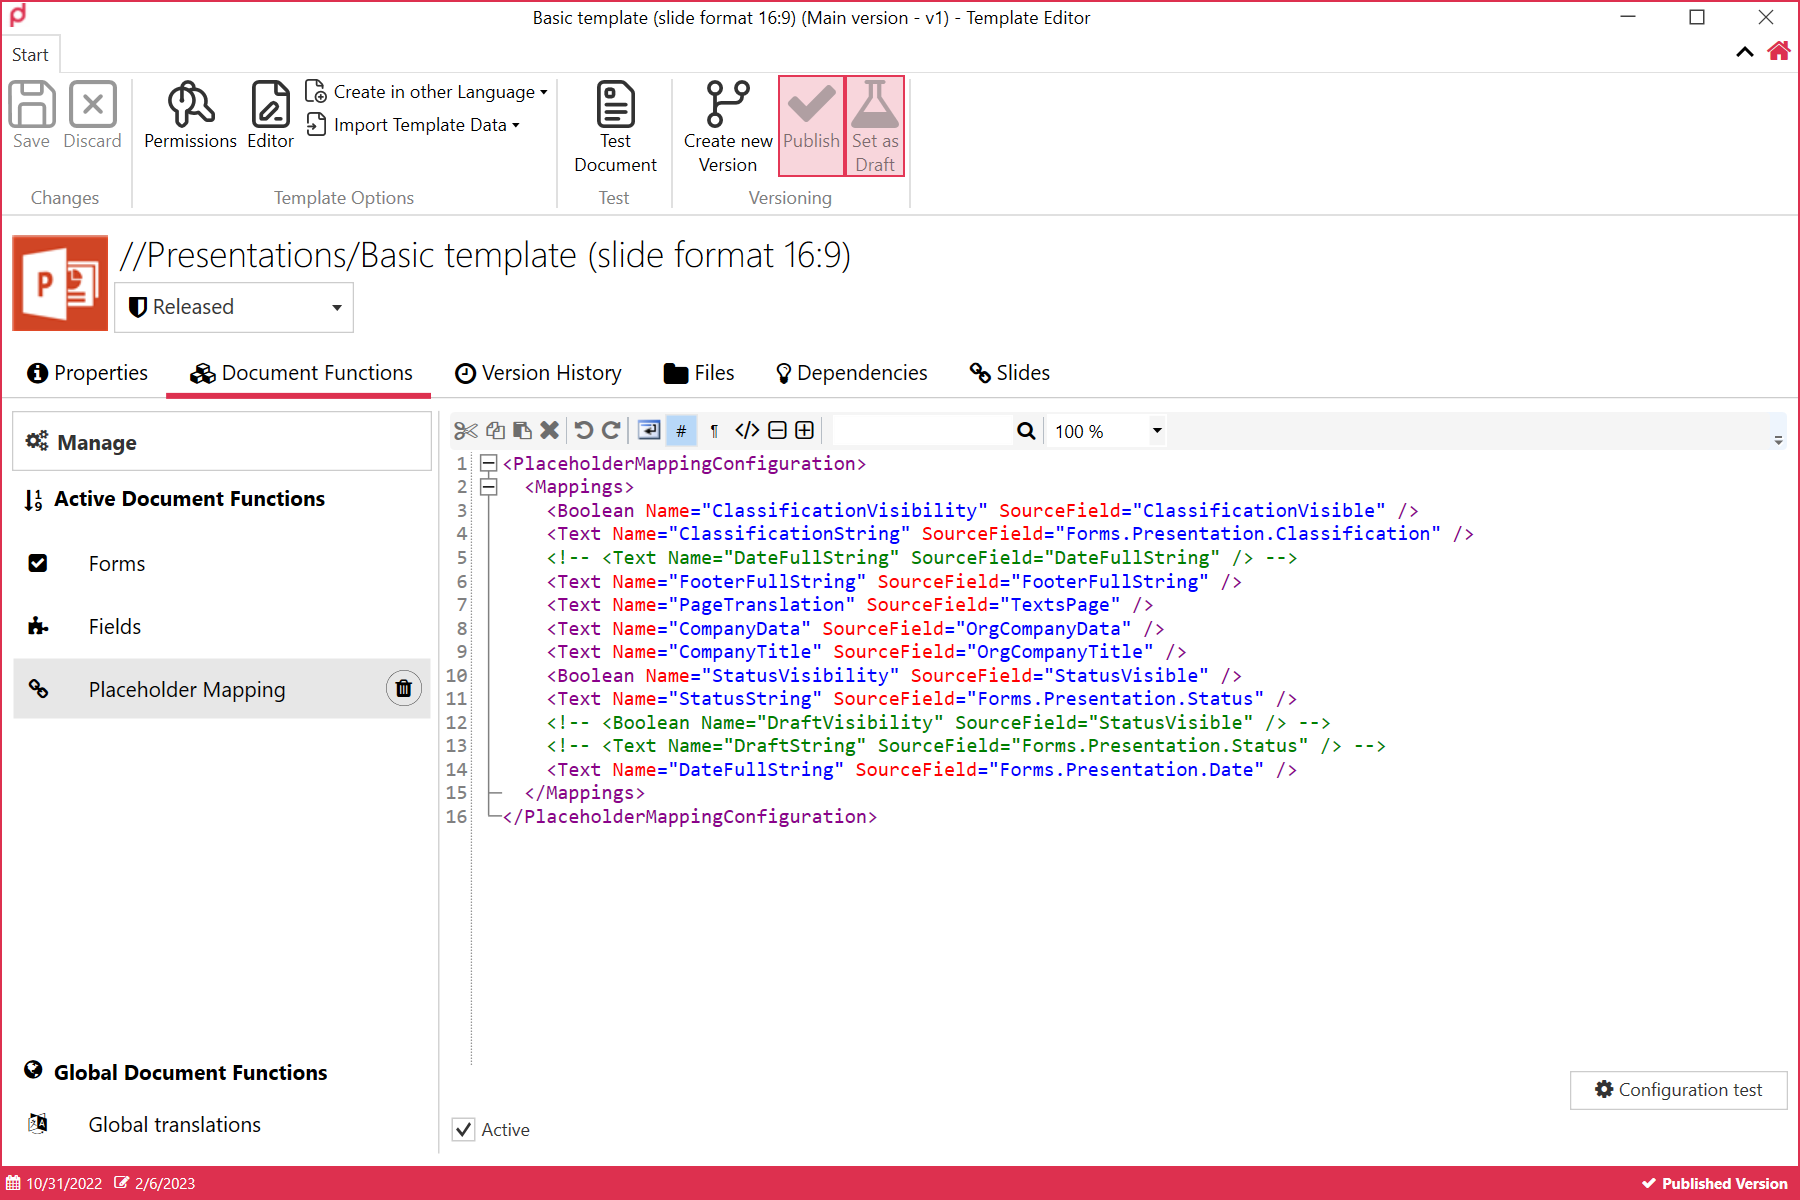
Boolean (YesNo)
‘YesNo’ are field declarations for a later check box with the status selected (true) or not selected (false). SourceField is required to map the field from Forms or Fields. Accordingly, the ID of the corresponding field is entered here.
Text
‘Text’ is later output as a text input field. Similar to the YesNo element, SourceField is required to map the field from Forms or Fields. Accordingly, the ID of the corresponding field is entered here.
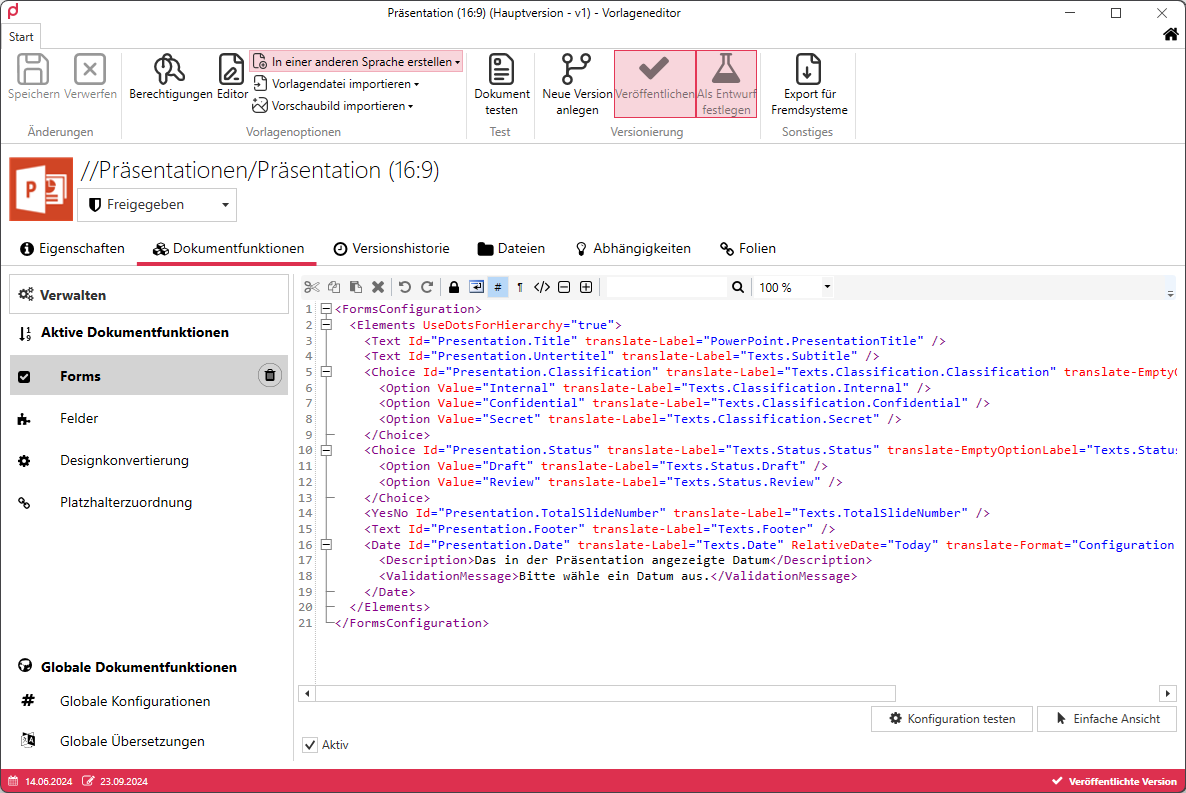
Fields
The contents of the various fields are defined in ‘Fields’.
The Fields chapter can be found here: Forms
For PowerPoint, ignore the subchapter ‘WordContent’.
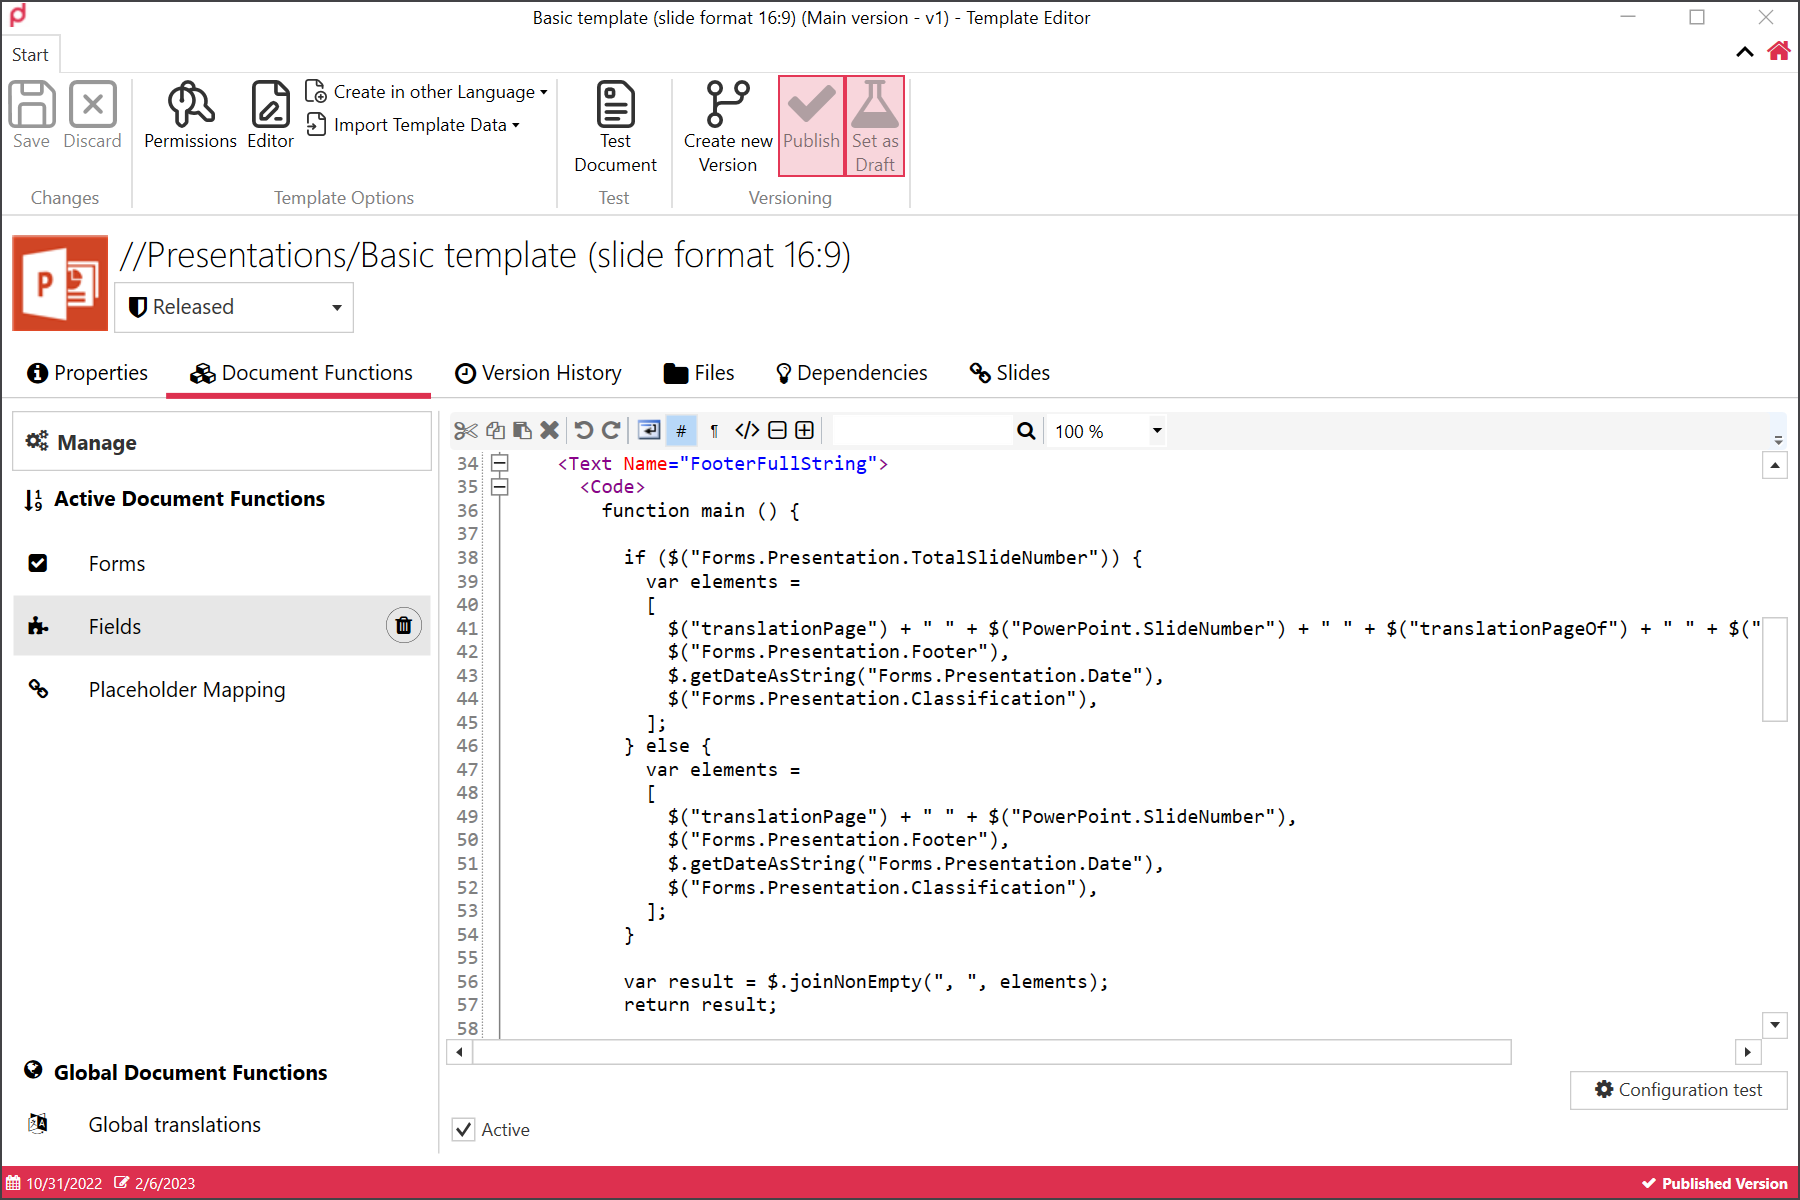
Example: FooterFullString
In the following example, the field “FooterFullString” is filled by concatenating the translation of “page”, plus a space, followed by the Slide Number, another space, and the translation of the “of pages” (= total number of pages), space and the total number of pages (cut off in the screenshot).
Then the presentation date and the classification is added.
If the checkbox “show total number of slides” is not selected, simply show the translated text “slide” and the slide number.
   function main () {

          if ($("Forms.Presentation.TotalSlideNumber")) {
            var elements =
            [
              $("translationPage") + " " + $("PowerPoint.SlideNumber") + " " + $("translationPageOf") + " " + $("PowerPoint.SlideCount"),
              $("Forms.Presentation.Footer"),
              $.getDateAsString("Forms.Presentation.Date"),
              $("Forms.Presentation.Classification"),
            ];
          } else {
            var elements =
            [
              $("translationPage") + " " + $("PowerPoint.SlideNumber"),
              $("Forms.Presentation.Footer"),
              $.getDateAsString("Forms.Presentation.Date"),
              $("Forms.Presentation.Classification"),
            ];
          }

          var result = $.joinNonEmpty(", ", elements);
          return result;

        }
Such operations are currently realised in JavaScript, which brings great flexibility but of course requires corresponding know-how.
Forms
Probably the easiest part of this is the creation of the Form.
This is straightforward and largely intuitive. To get started, simply double click on the form preview or on “Edit”:
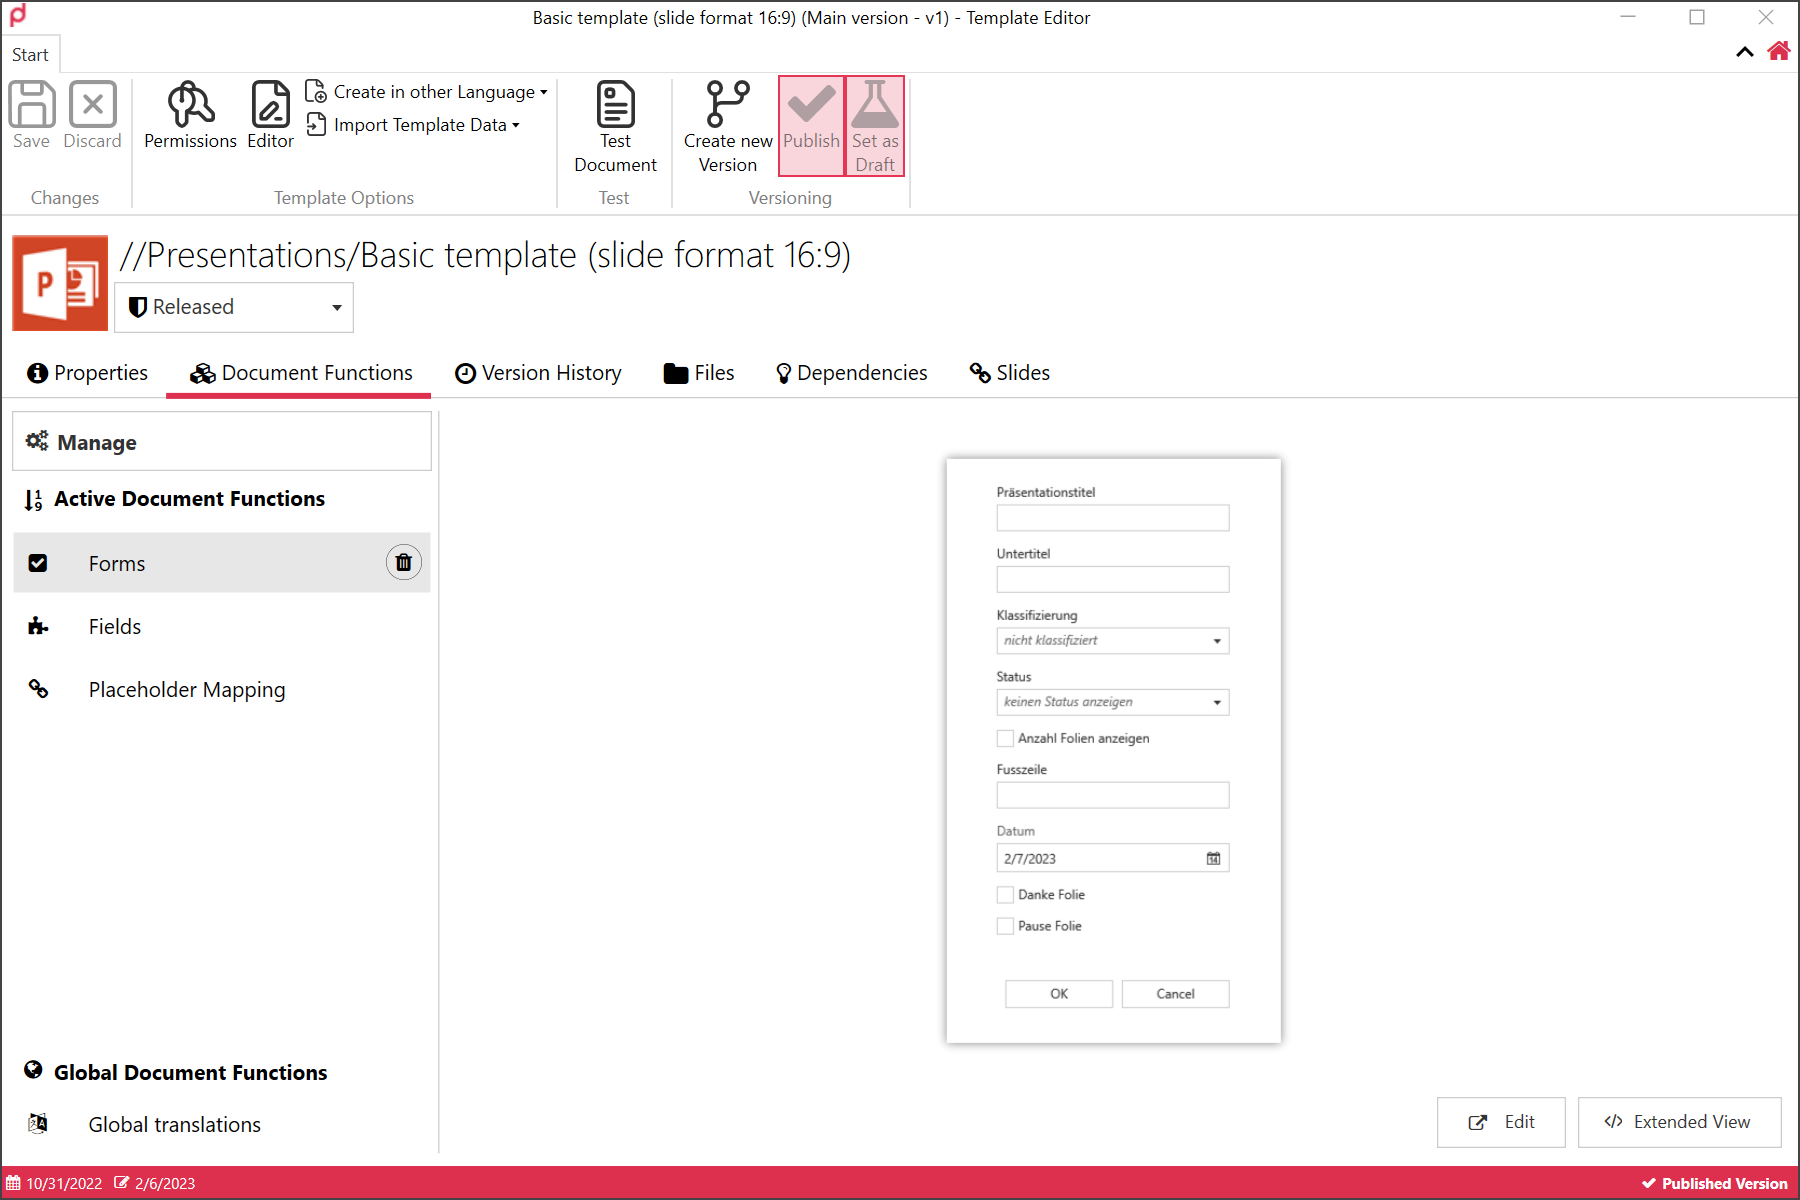
This opens the Forms edit panel:
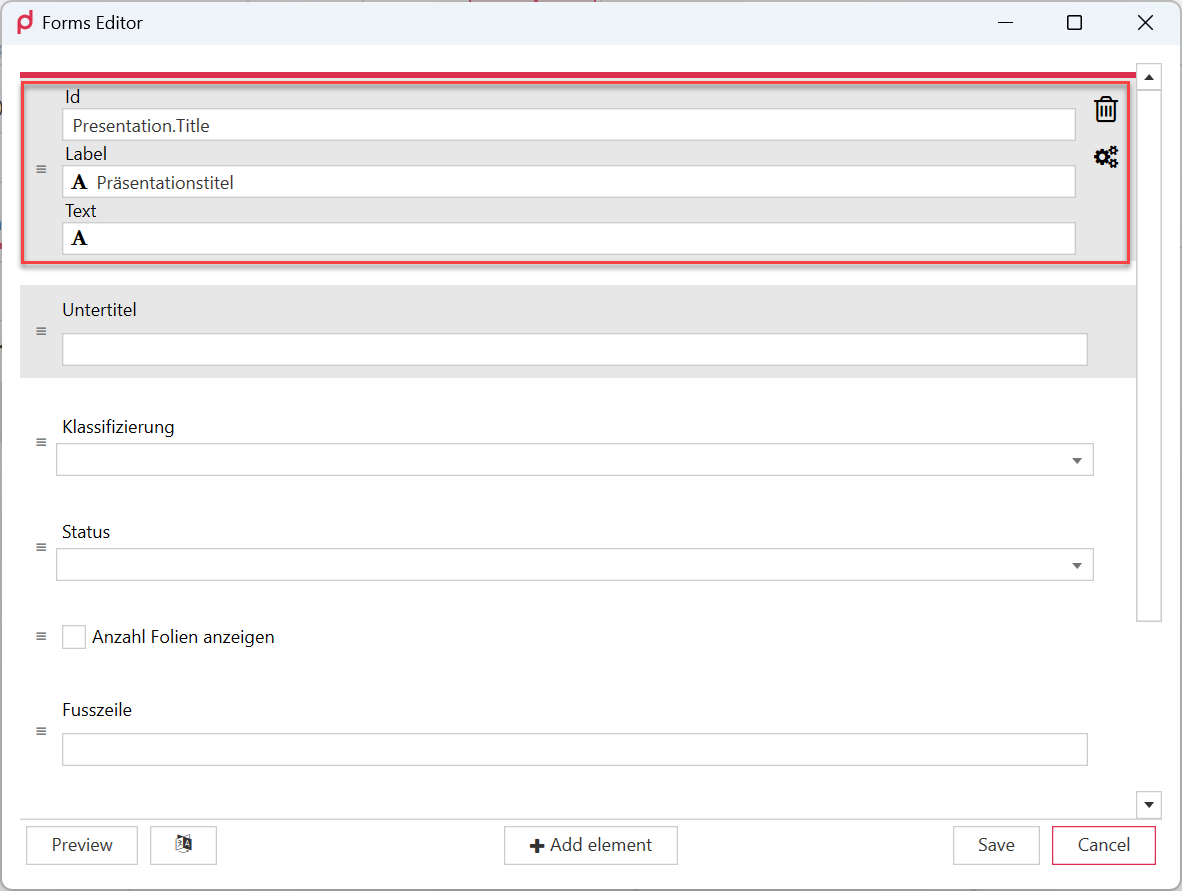
You can add new elements by clicking on the “Add element” button in the lower centre of the panel, which will open this dialogue:
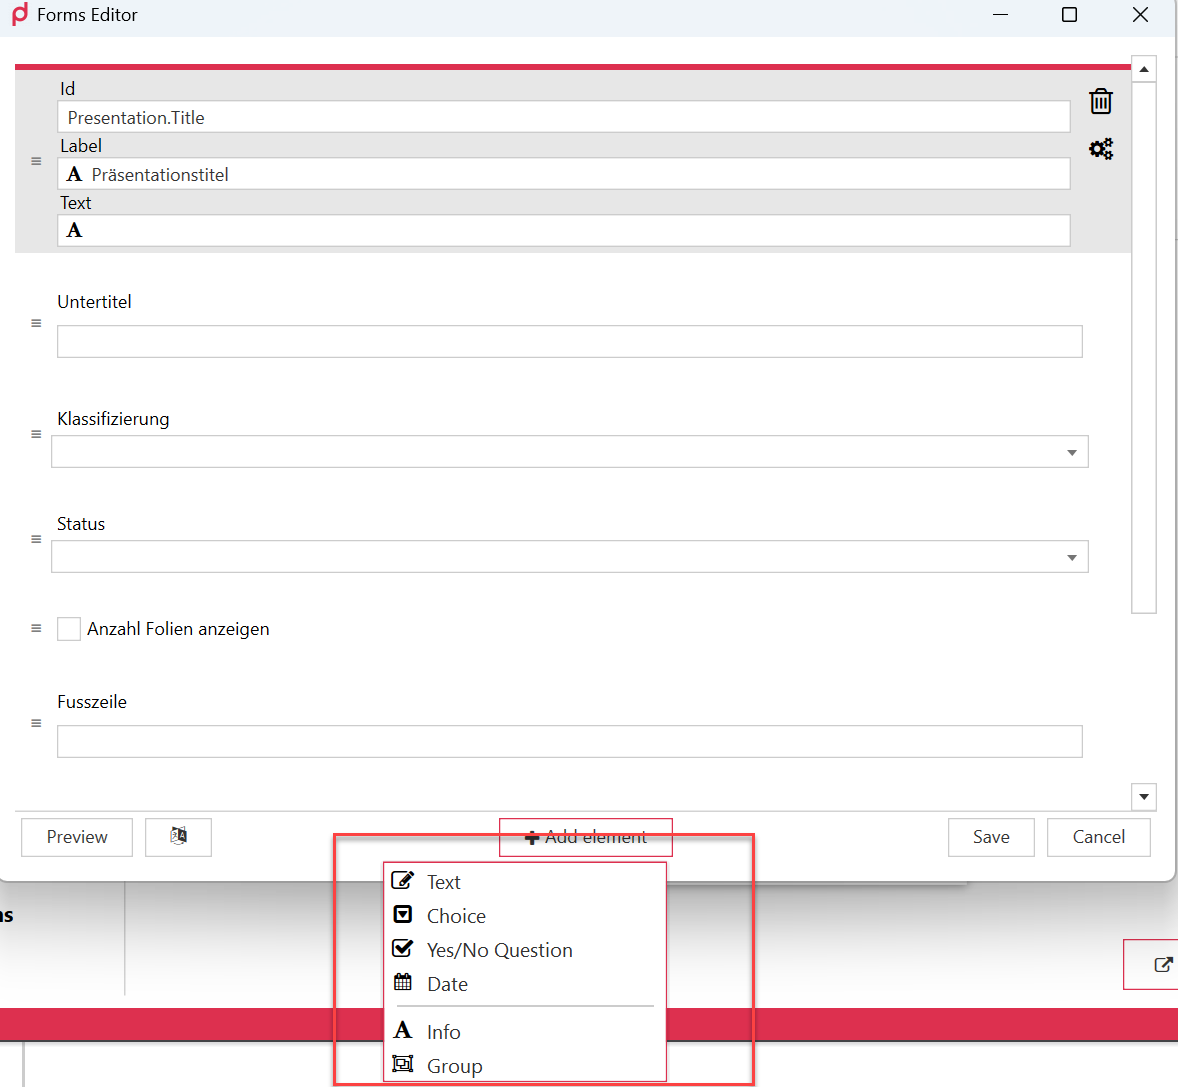
The options are as follows:
- Text is a simple text entry field
- Choice is a dropdown menu
- Yes/No Question is a checkbox
- Date is a date selection field
- Info is a text with no interactive functionality for the user. Use this to add an instruction, for instance.
- Group lets you create a subgroup of fields that are optically arranged in a group
Note in the screenshot above that the grey-marked text entry field consists of three subfields:
- Id is the technical Id that you can use to refer to this field (more on this later)
- Label is the Text beside the text entry field which describes the text entry field
- Text is the actual text entry field. Enter text here to have that text appear pre-filled-in.
The rubbish bin symbol deletes this field entirely, and the cogwheel symbol opens an attributes menu for this field:
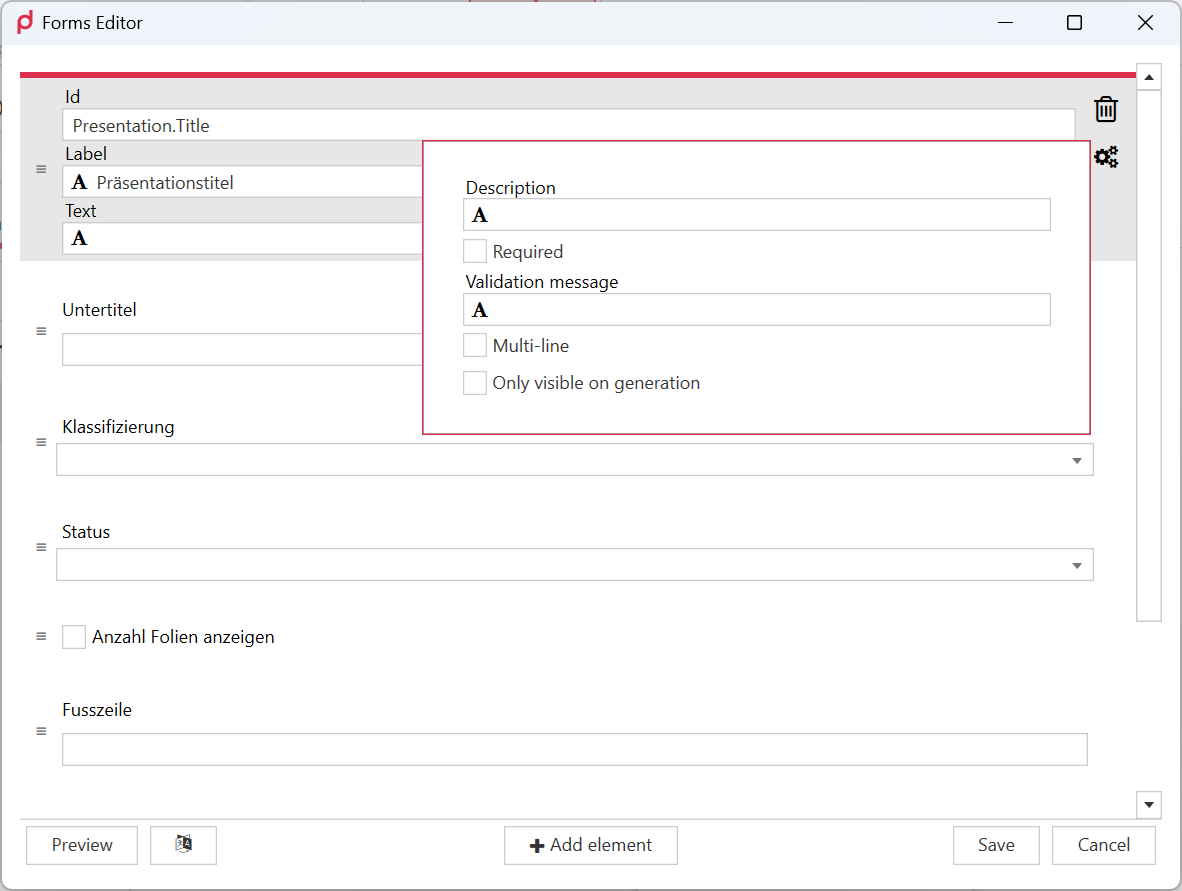
These options expand the functionality of the field significantly:
- Description is the text that appears on mouseover
- Required (if selected) means that the OK button is greyed out until this field is filled in.
- The validation message is the text that appears if the this field is NOT filled in.
- Multi-line activates the text scrolling functionality for this field, so that multiple lines of text may be entered
- Visible only on generation shows this field only when a new presentation is being created, but not if the user later, from an existing presentation, if the user clicks on “Properties” in the primedocs menu ribbon.
As you build your data entry form, you can click on the “Preview” button at any time to see the end result - there is no need to actually exit and start to create a document or presentation to test this.
There are some limitations to the Forms method of creating a data entry form, though, compared to the Document Parameter approach in a system such as OneOffixx. First and foremost:
- Fields can only be placed one above the other. We have no ability to place fields (even checkboxes) beside one another. This limits the number of fields we can use, because the form should not become so long that the user can no longer press the “OK” button.
- We have no capability to create adaptive fields - fields which are set to appear or hide based upon the selection (or non-selection) pr another field or checkbox.
- We have no radio button ability - only multiselect checkboxes.
So there are limitations compared to, say, OneOffixx - but primedocs is constantly evolving and growing, and these are areas that are specifically being focused upon.
Advanced view
Slide Set template - Creating and configuring it
So - by this point we have the master template and the content template (which primedocs simply calls “the template”). But we’re not done quite yet. We also need a slide set - which, put simply, lists the slides that the user will be able to insert using the primedocs ribbon button “Insert slides”.
So back we go to the “New template” dropdown menu, and this time around, we choose “Slide set Template”:
To maintain a clear overview of the slide layouts, it is advisable to number them. See example:

If the slides are not numbered, they will be sorted in alphabetical order.
Once all slide templates have been created, you can export your content template by selecting the template in question, clicking on ‘Edit template’, switching to the “Files” tab, selecting the line with the template and clicking on ‘Export’. You can save this template in any location and import it into all slide templates.
The ‘Based on’ field does not need to be specified in the slide templates, as the slide templates will be assigned in the content template.
If all slide templates have a template stored, you only need to specify which layout should be used when the template is inserted into the generated presentation. You can do this by selecting the first slide template, clicking on ‘Edit template’, selecting the ‘Editor’ and removing all slides that are visible (not in the slide master) and inserting the corresponding slide that applies to the open layout via the “Start” → ‘New slide’ tab.
Then save your template. To see what the slide might look like, a preview image is created in the next step. Fill the inserted slide with content and then click on ‘File’ → ‘Save As’ → “Browse” → ‘File Type’ → .jpg, .png or .xps. Then delete the filled slide and insert the same slide again via the ‘Home’ tab so that the slide is inserted empty at a later point in time. Save your template.
Now return to your template editor window and insert the saved preview image.
Repeat these steps for all slide templates.
ℹ️ Info It is also possible to create slide templates with fixed content. Entire presentations, slide packages or individual slides can be stored.
To create a link to the master template, switch to your content template and go to the template editor. There you will see the ‘Slides’ tab. Switch to this tab. All slide layouts are automatically listed there.

Under ‘Slides’, there are two different ways to assign a layout.
- + Upon generation
- + Optional
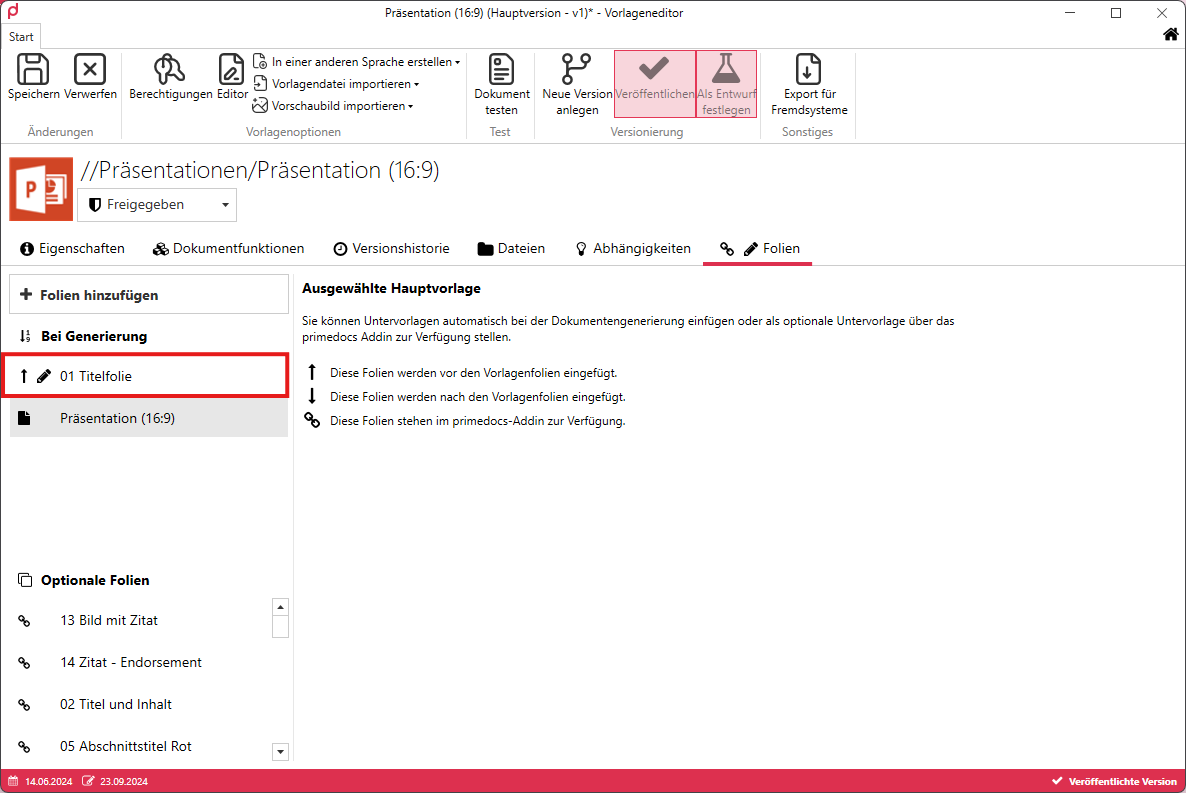
+ Upon generation
The ‘+ Upon generation’ area is used to insert the slide into the presentation when it is generated. If you have already defined slides (template slides) within the presentation using the editor, the slide inserted via ‘+ Upon generation’ will be inserted after them.
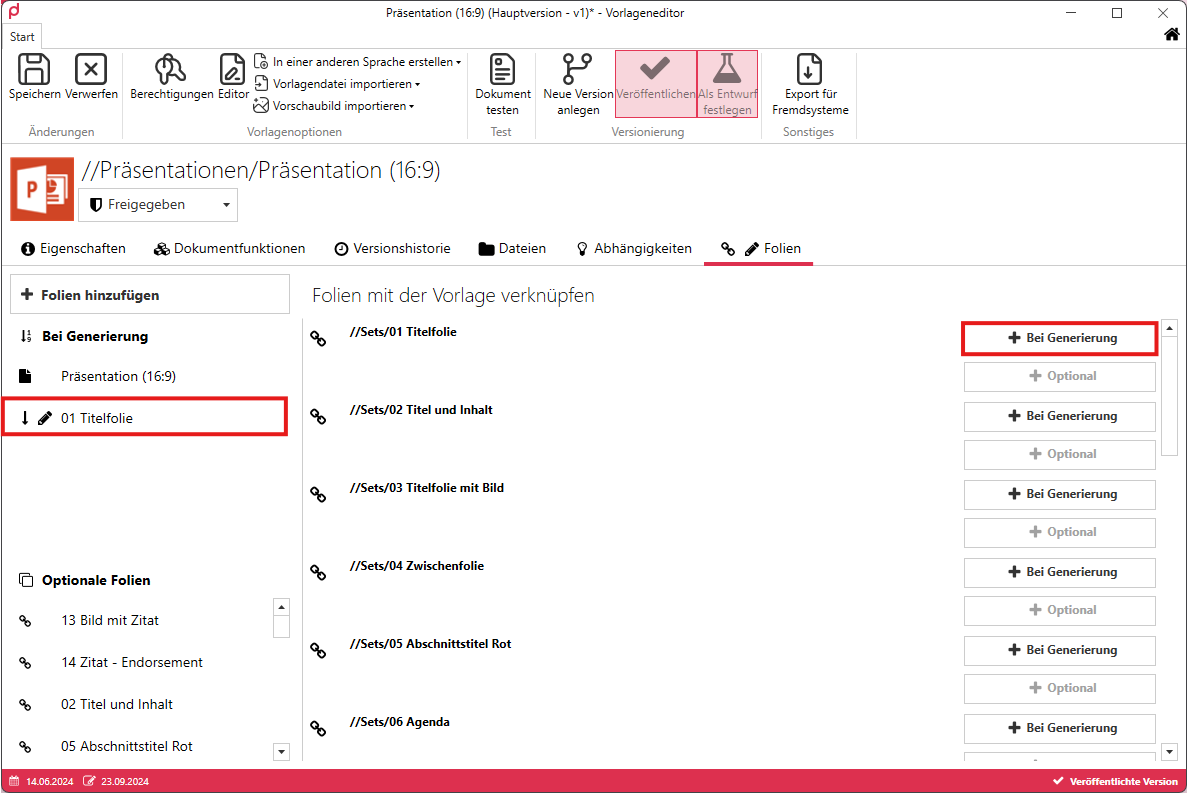
If you want the slide to appear first, followed by the template slides, you can click on the slide with the mouse and drag it above your template, in this case ‘Presentation (16:9)’.
If the slide layout is to be inserted under a specific condition, you can click on the slide layout and, under Settings, set the checkbox from ‘Always insert this sub-template’ to ‘Only insert this sub-template if the condition is met’.
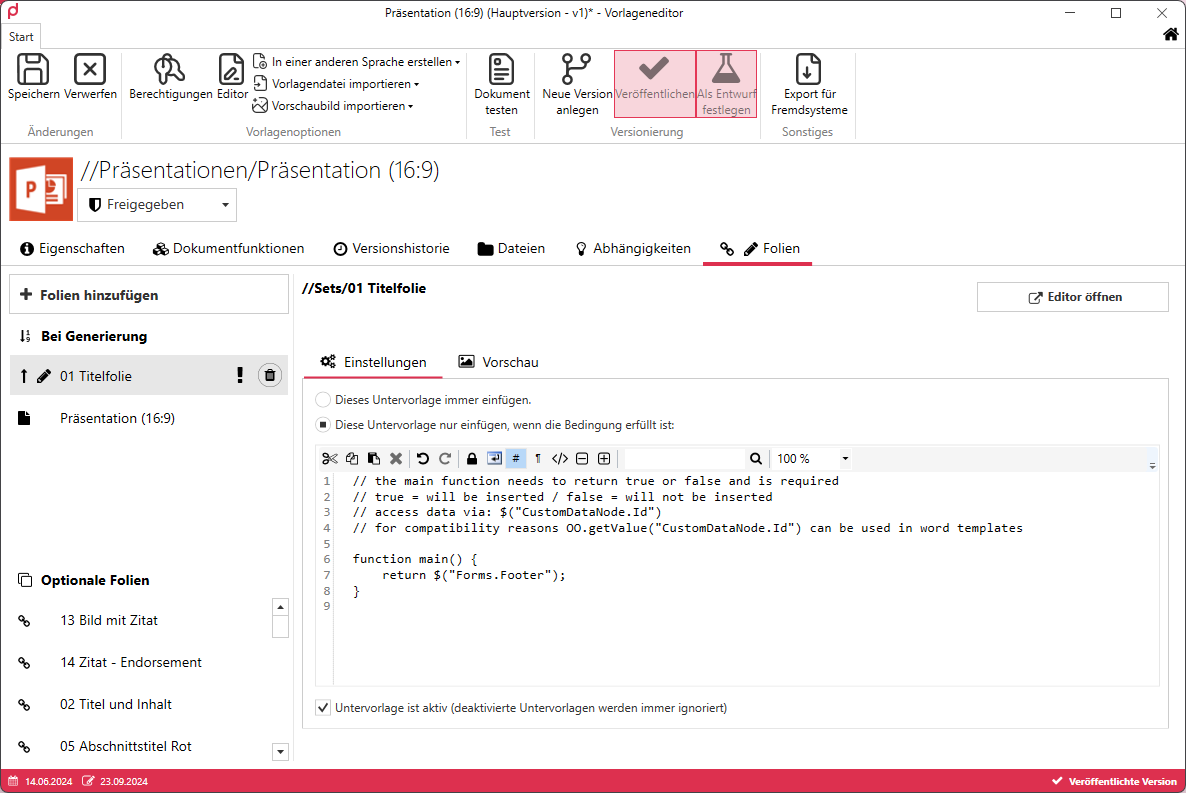
Now you can specify your desired condition.
+ Optional
If the ‘+ Optional’ selection is made, the slide will be applicable to the user under ‘Slides’. After assignment, no further steps are required here, apart from saving the changes.
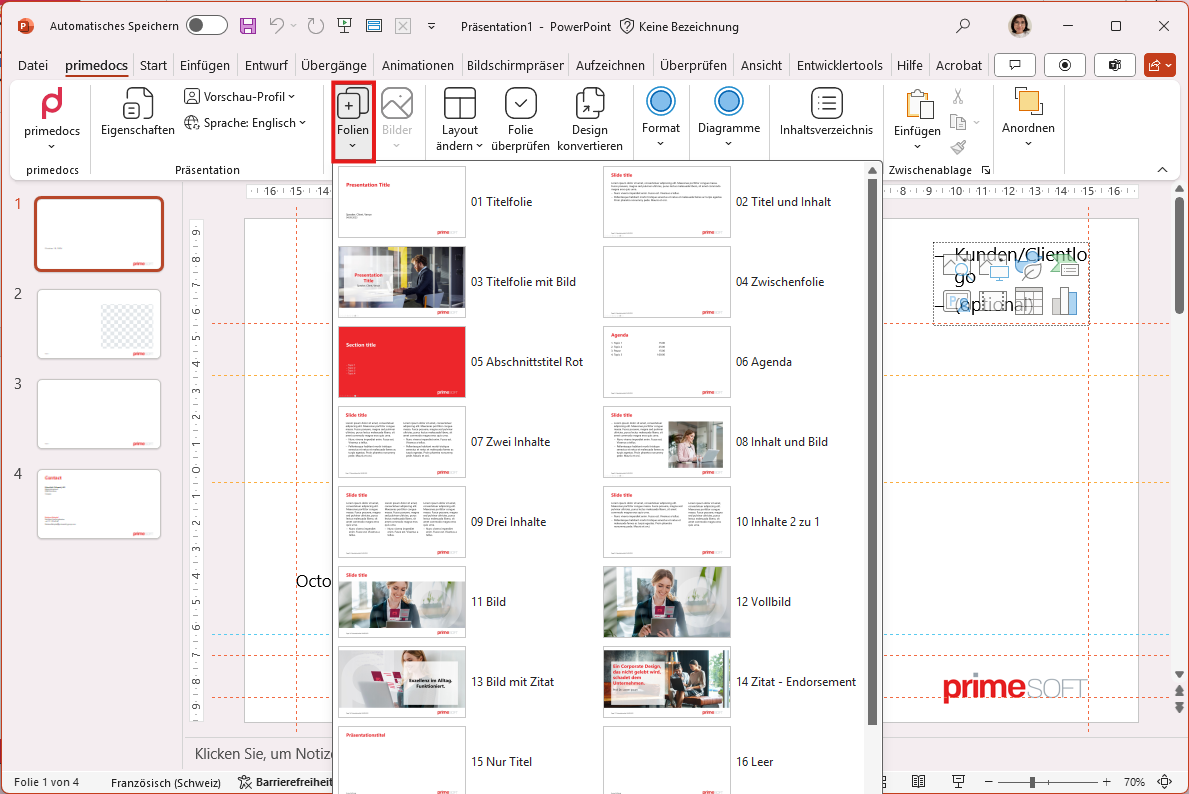
Table of contents - Create
Select ‘New Template’, give the table of contents a name, and then select ‘PowerPoint Table of Contents’ from the template type drop-down menu.
Under ‘Based on’, select the corresponding master template so that the table of contents has the correct slide master.
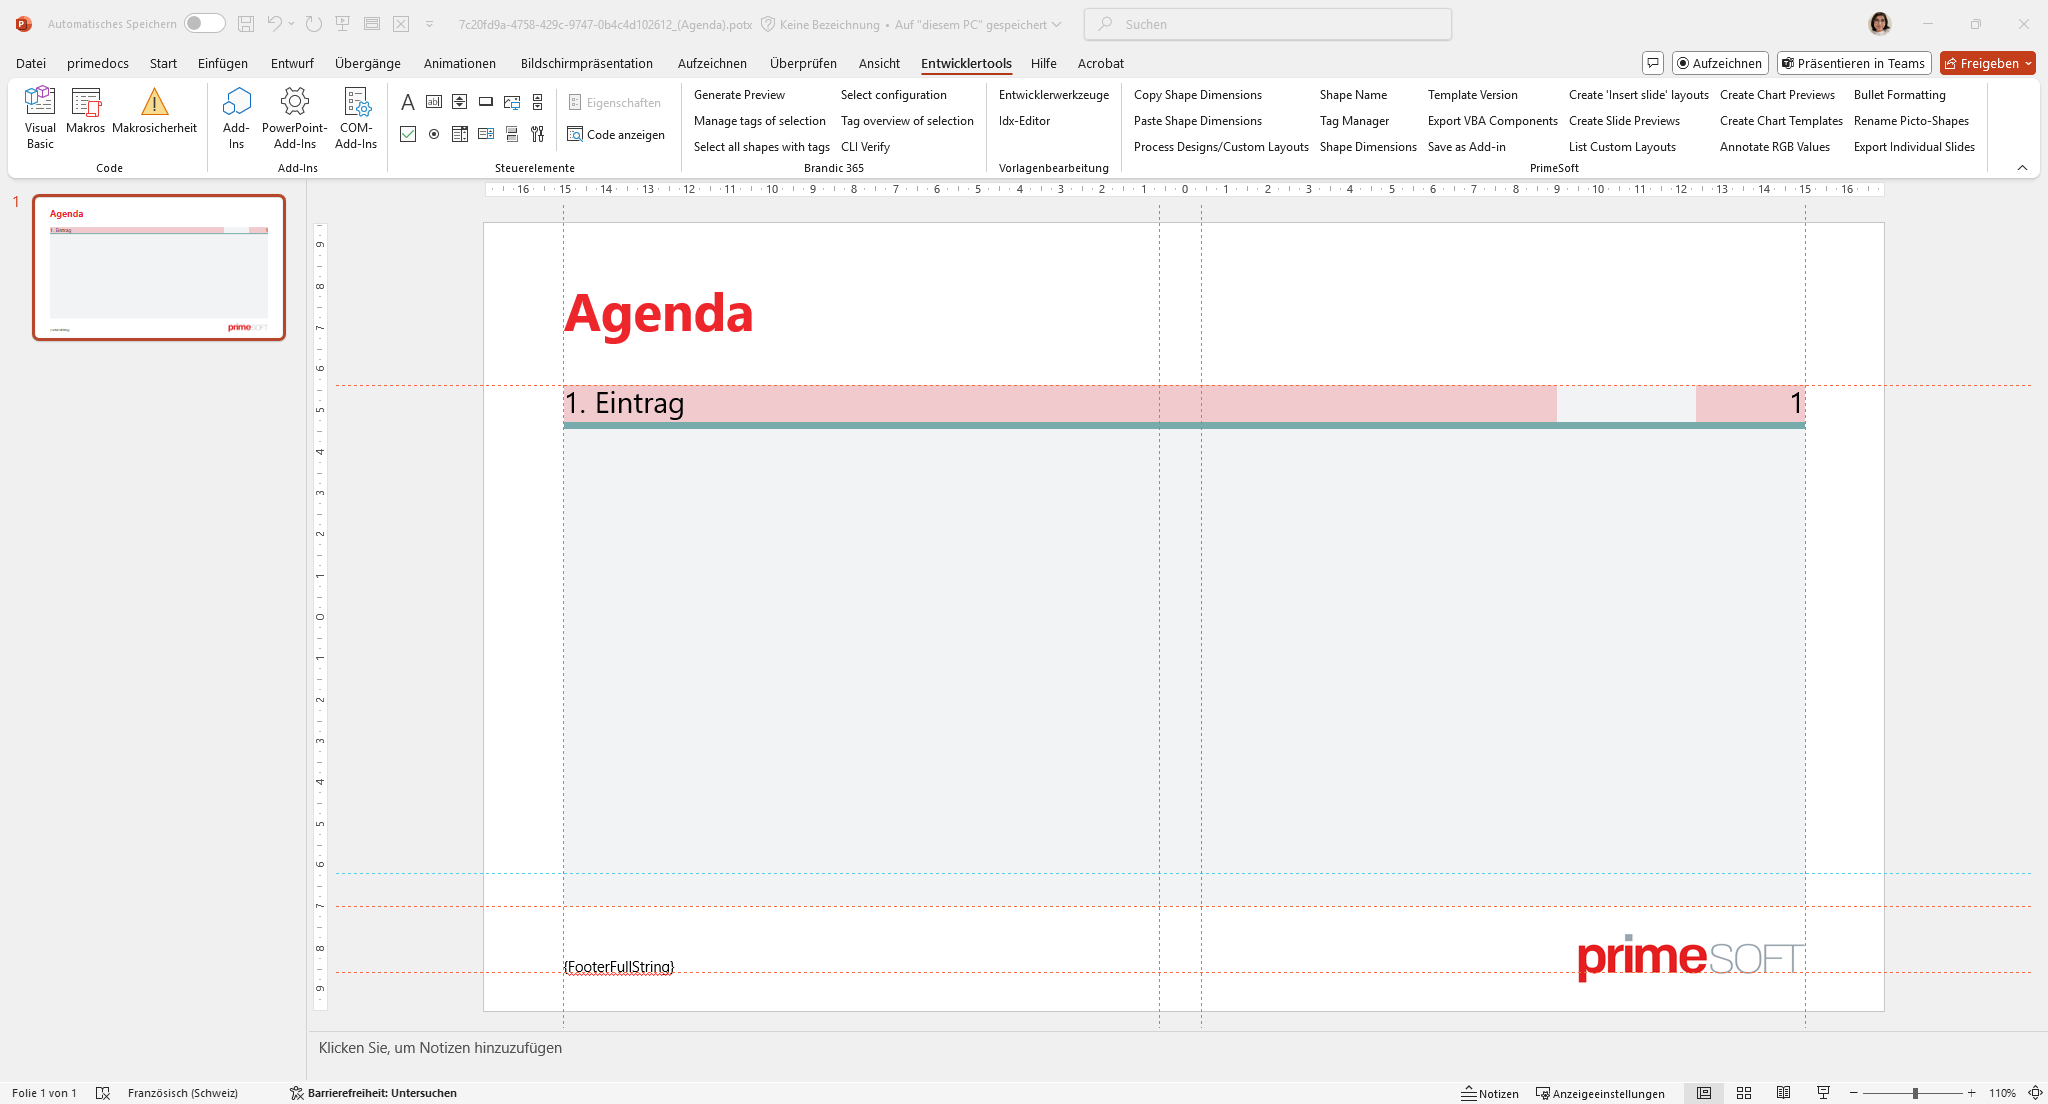
Next, click on ‘Editor’ to edit the table of contents. Once you have opened the template, insert your agenda slide and delete any content placeholders except for the slide title.
Insert a shape for your entry, a shape for the page number and a shape for the spacing between entries. Format the shape for the entry and the page number according to your corporate design guidelines.
Example – we have highlighted the fields for you, which will be saved without filling in the final version:
To enable primedocs to work with these forms, there are various editing tools at the top left.

- Select the ‘Define agenda title’ button for the entry form.
- ‘Define agenda slide numbers’ is used for numbering.
- The spacing between the various entries (highlighted in green in the example) is assigned using the ‘Define agenda spacing’ button.
- The grey area determines the height range. As soon as the table of contents exceeds the specified height range, primedocs creates a new slide in which the table of contents is continued. For this to happen, the area highlighted in grey in the example must be assigned the ‘Define agenda height range’ button.
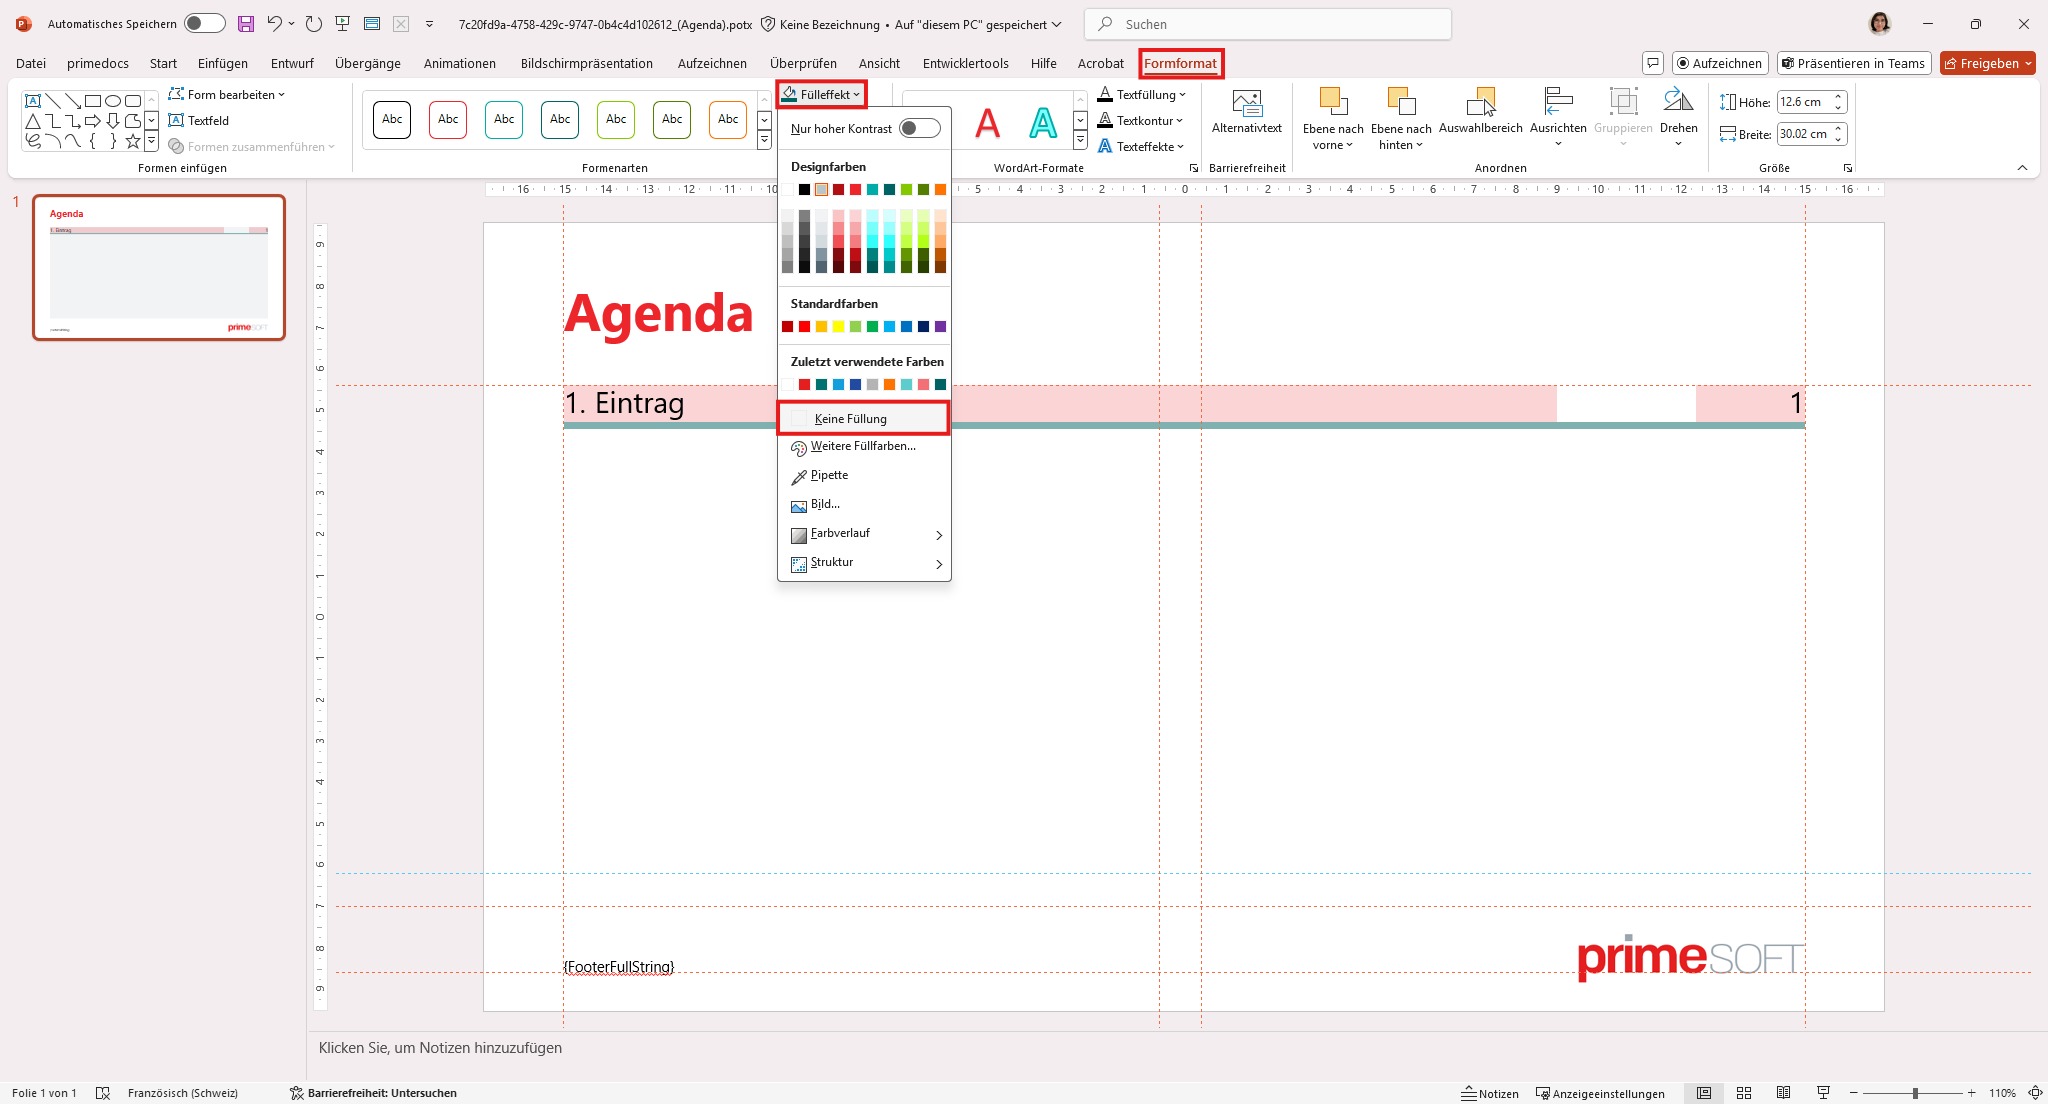
ℹ️ Info Finally, before saving the table of contents template, set all shapes to ‘No fill’. This can be done in the ‘Shape Format’ tab → ‘Fill Effect’ → ‘No Fill’.
Save your template.
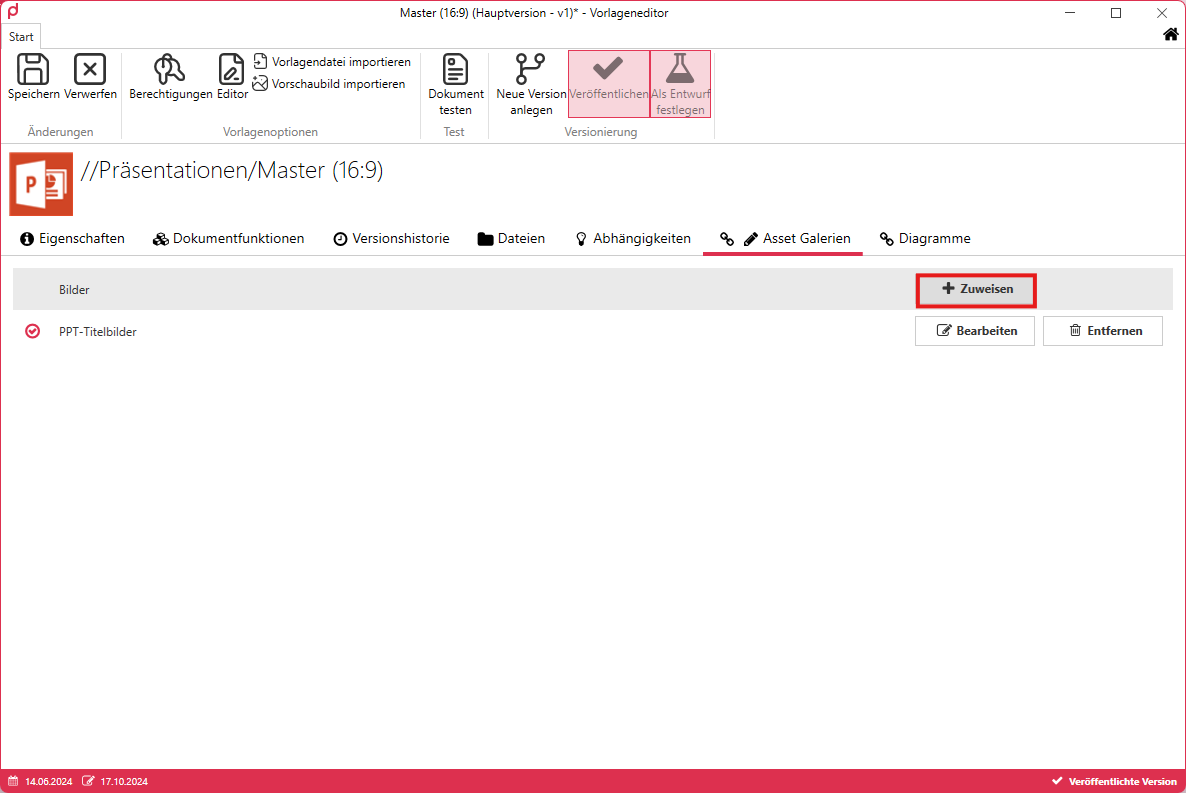
Image gallery - Create and link
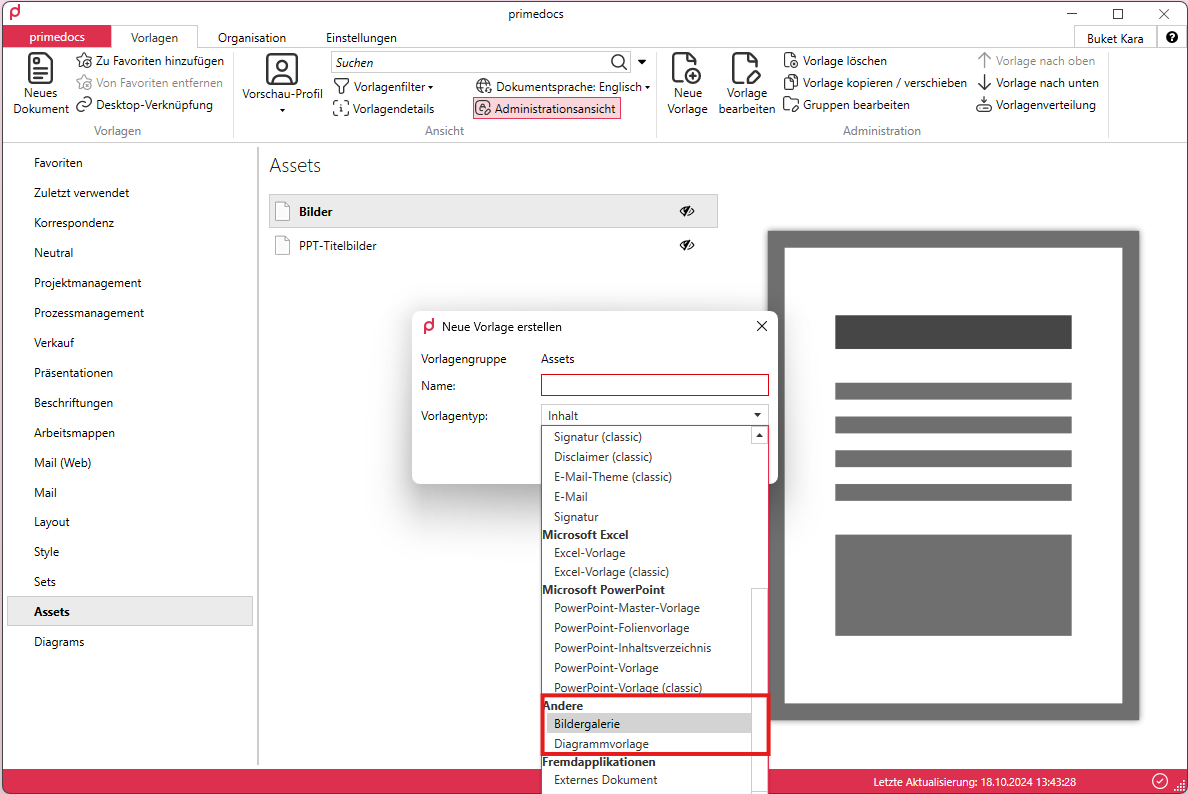
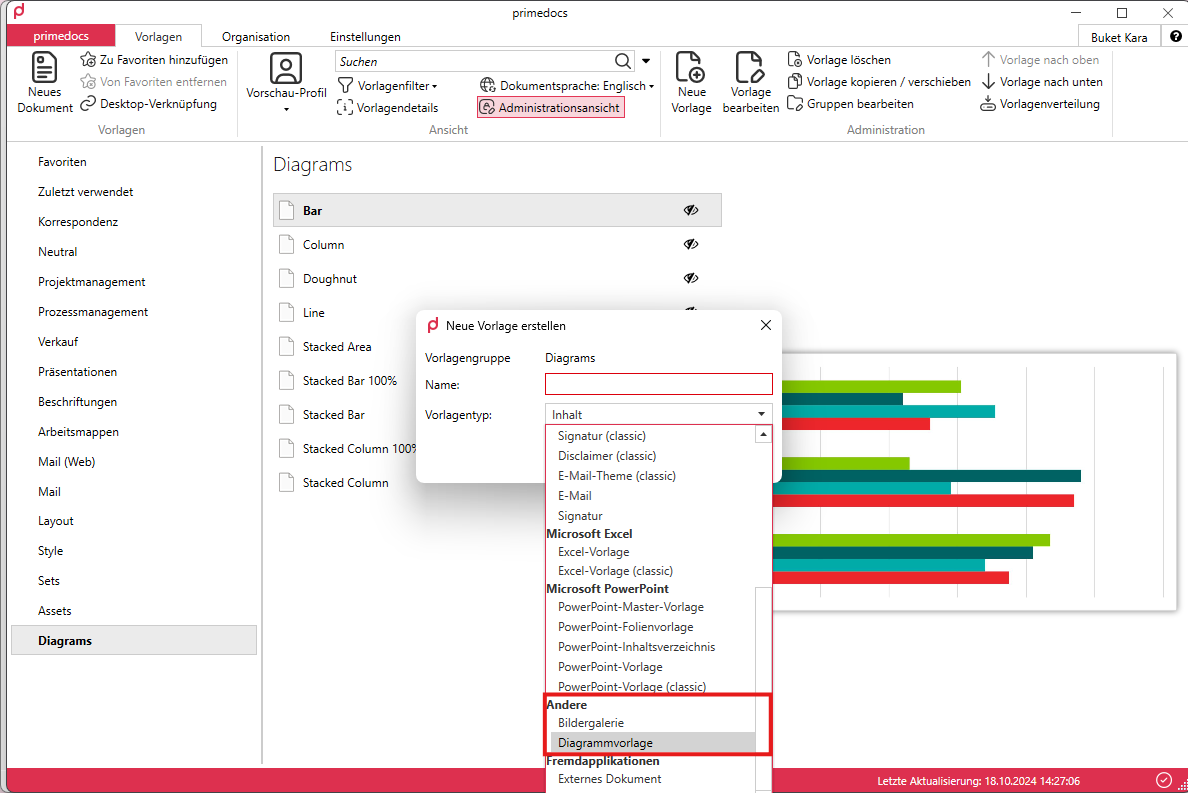
You can store the image gallery under the created group ‘Assets’. This is stored by creating a new template with the template type ‘Image gallery’ under the category ‘Other’.
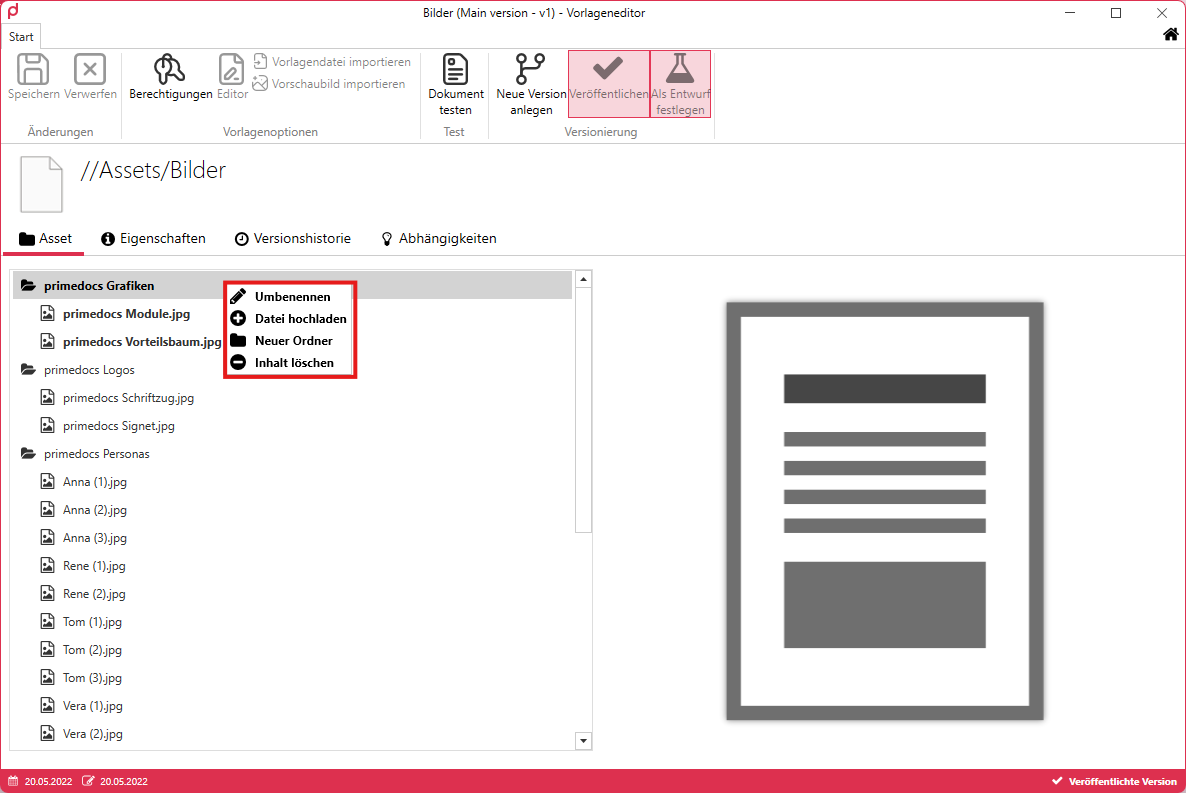
Once the image gallery has been created and you have reached the template editor, you can build your structure using drag and drop or manual storage by right-clicking → ‘Upload file’ or ‘New folder’. If you want to rename folders or images afterwards, you can do so by right-clicking on the folder or image → Rename. You can also delete images and groups by right-clicking.
After uploading your corporate design images and saving them under ‘Save’, you must link the image gallery to the master template so that they are available in the templates.
To do this, go back to your master template and open the template editor. Switch to the ‘Asset Galleries’ tab and assign your desired image gallery(ies), if there are several, to your master template.
Once this step has been completed, return to the document functions and select the document function ‘Slide layout’. As mentioned in the subchapter ‘AssetFilter’, this is where you specify which slide layout has access to the image gallery and which folder or image it refers to so that the images are available to the user.
The configuration can be used to refer to the image or group:
Entire image gallery
      <AssetFilter>
        <Include Path="(Name of the image gallery)/" />
      </AssetFilter>
Single group
      <AssetFilter>
        <Include Path="(Name of the image gallery)/(Name of the group)/" />
      </AssetFilter>
Single image
      <AssetFilter>
        <Include Path="(Name of the image gallery)/(Name of the group)/(Name of the image including extension .jpg/.png)" />
      </AssetFilter>
Diagrams - Creating and linking
To create and save diagrams, you can generate your content template. None of the form fields need to be filled in for this, provided that none of them are marked as mandatory.
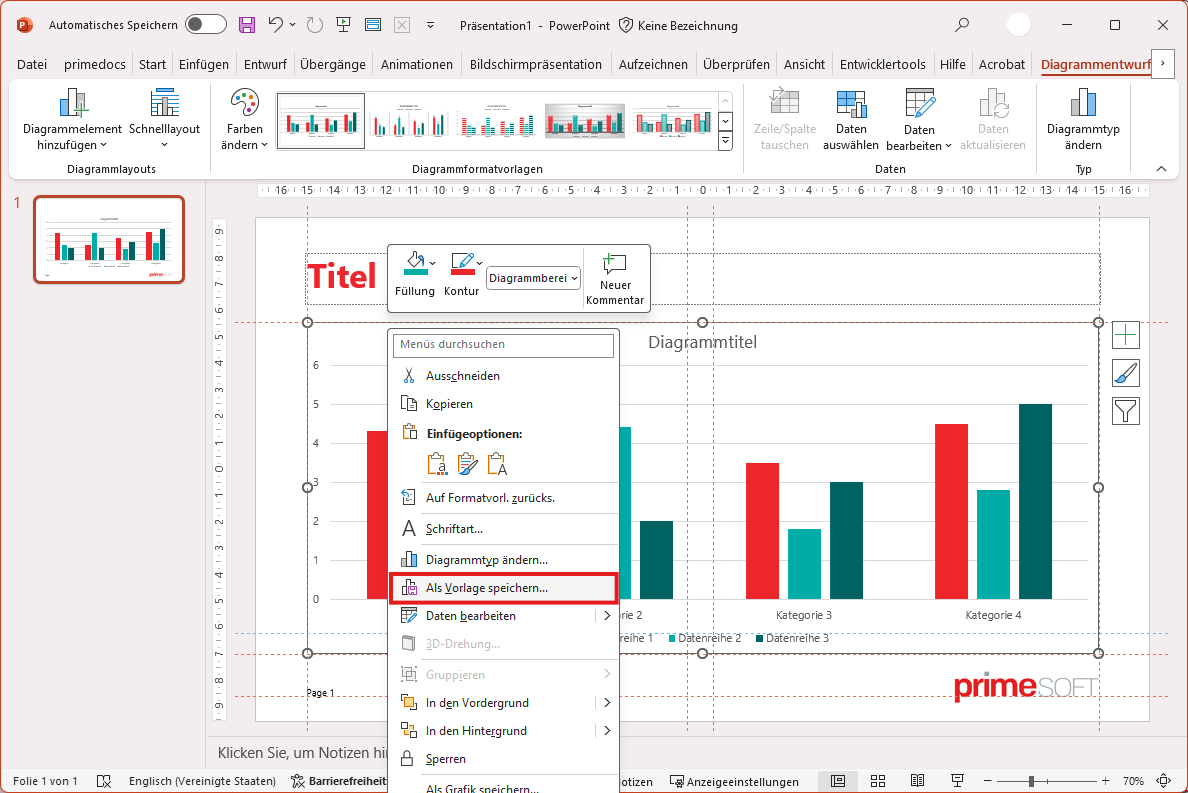
First, save your presentation and remove all slides from it. Now add the number of title and content slides corresponding to the number of charts you want to store. It is important that the slide has a chart/multifunctional placeholder available. Then add your desired chart to each slide. The following charts can currently be added in primedocs:
- Bar charts
- Line charts
- Pie charts
- Doughnuts
- Bar charts
- Area charts
When you are satisfied with your selection, select one of the charts, right-click on it and select ‘Save as template...’ from the menu.
Save your chart and make a note of the path. Repeat this step for all charts.
Next, the preview images of the charts are created. To do this, it is worth deactivating the chart title, legends and axes. You can deactivate these on the right-hand side of the diagram using the ‘+’ sign above the brush. Once you have done this, right-click on your diagram, select ‘Save as image...’ and save your image, ideally in the same path as your diagrams or in any location of your choice.
ℹ️ Info You can save your diagram template, which contains all diagrams, in a secure location and revise/expand it in the future. This will save you time.
Switch to your client and select the group ‘Diagrams’ (or whatever you named the group) and add a new template of the category “Other”, template type ‘Diagram template’.
Open the template editor, click on ‘Import template file’ and import your saved diagram template. Do the same with the preview image.
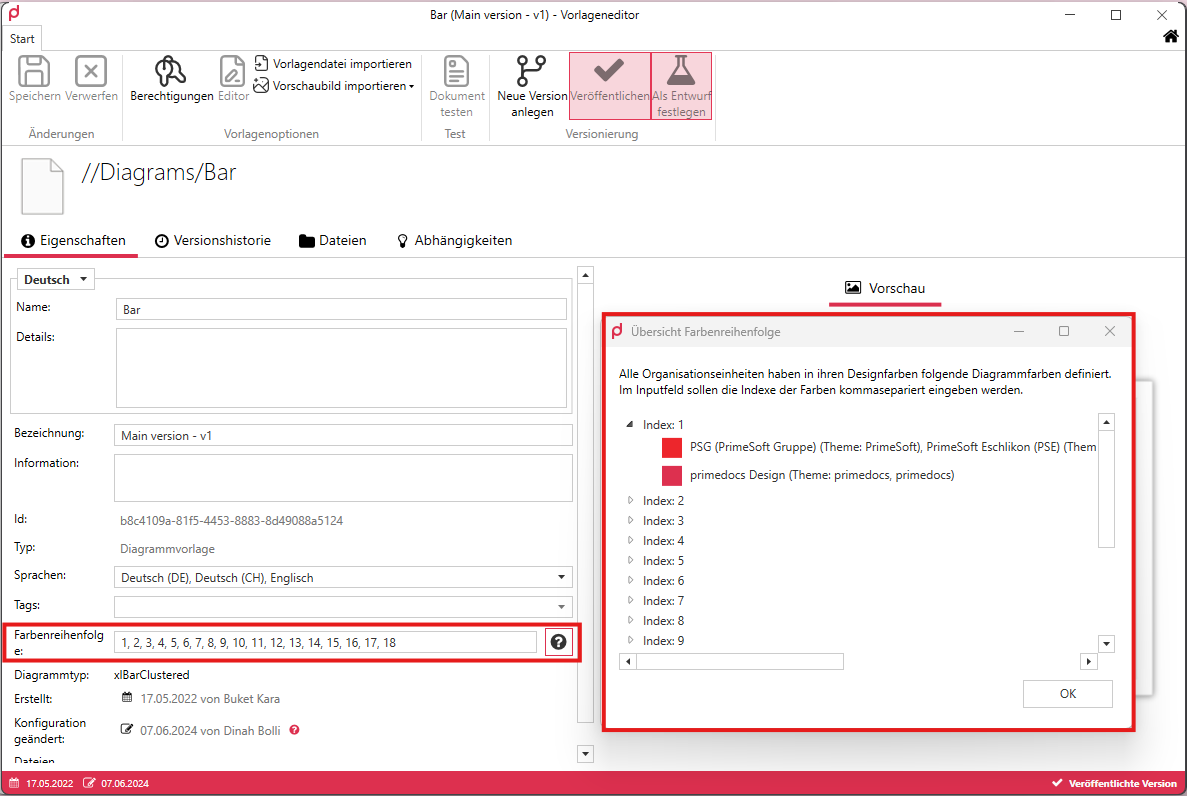
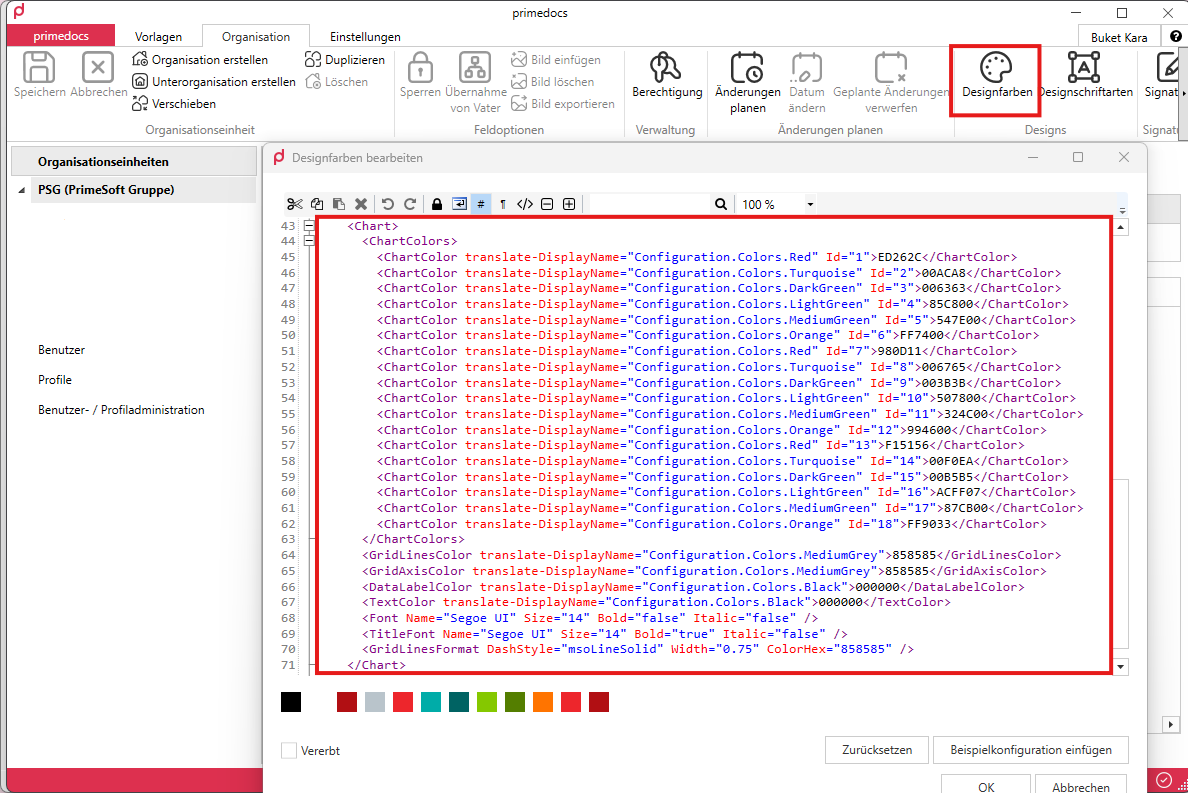
A new line called ‘Colour sequence’ will then appear in the diagram templates. Enter the index values for the diagram sequence in this field. To find out these index values, click on the question mark icon to open a separate window. This window contains the index values. You can expand it and view the stored colour values. If you have several organisational units with different colour themes, the corresponding organisational unit is listed for each new colour theme.
Determine your colour sequence and enter the index number in the colour sequence input field.
Repeat these steps for all charts.
ℹ️ Info The index colours and other details are defined in the organisational units → Design colours under
<Chart></Chart>.
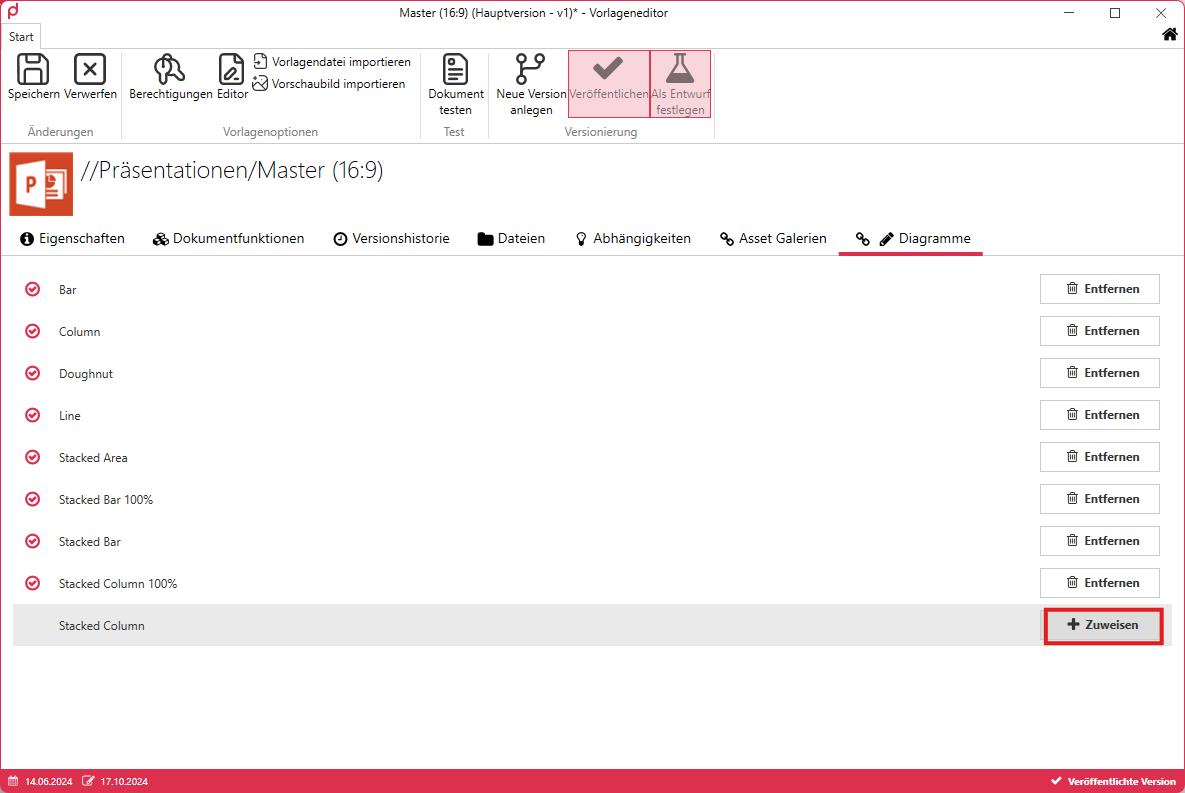
Finally, the diagrams must be linked to the master template in the same way as the image galleries. Switch to the master template and select the ‘Diagrams’ group. Assign all diagrams that you want to include in the master template and content templates based on it.
Save your changes and synchronise the client.
Your PowerPoint template is now complete.