Outlook (New): template creation
This page explains how to create templates in primedocs desktop for the web-enabled Outlook version Outlook (New).
Not familiar with the primedocs add-in in Outlook (New) yet? Read this page: Word Templating Basics
- 1 Tools
- 1.1 Outlook (New)
- 1.2 Templating
- 1.3 Template Editor(HTML)
- 2 Template creation
- 3 Creating an email template
- 3.1 Preparation
- 4 Create signature template
- 4.1 Example
- 4.2 HTML code and result
- 4.3 Explanation of HTML elements
At the outset, ensure that
- the administration view is activated in primedocs desktop. the Outlook (New) template you wish to edit is only visible to you.
Tools
When editing or creating templates for Outlook (New), we are in two areas:
- in Outlook (New) via the application or browser: in an open empty email and in the sidebar of the primedocs add-in in the templating menu.
- in the template editor of a primedocs template for Outlook (New). The template editors are designed so that the template is edited in HTML.
Since all email messages in Outlook (New) are HTML-based, the templates in primedocs are also created in HTML in a template editor.
Outlook (New)
When creating a template, first open a new email message in Outlook (New). This is where you will build the template with Outlook.
Templating
The templating menu is required for template creation. To do this, open the primedocs add-in: primedocs Add-In - Outlook (New)
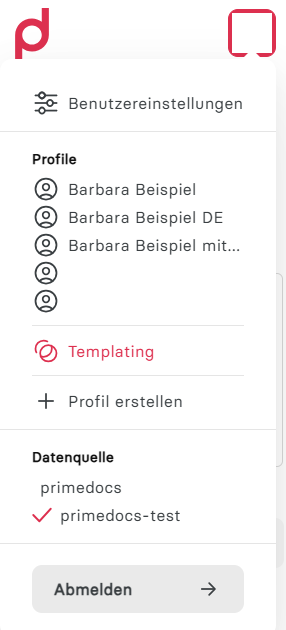
When you click on your profile picture, you will see the Templating option. Click on it.
If you do not see Templating, you are not authorised to edit Outlook (New) templates. Contact your organisation's administrator.
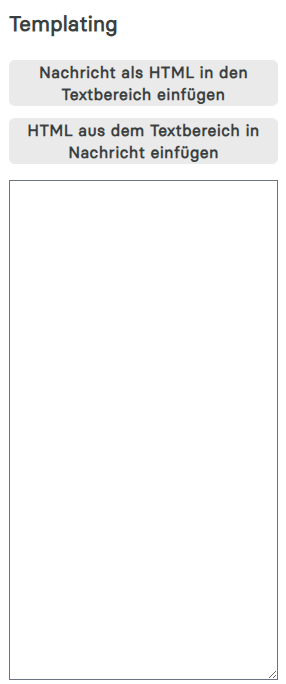
The templating menu will then open.
IMPORTANT
The templating menu is an integral part of creating Outlook (New) templates.
It simplifies the implementation of templates with HTML by offering conversion options from the visible content in the email message to HTML and vice versa.
Click on ‘Insert message as HTML into text area’ if you want to convert the content in the email message to HTML.
Click on ‘Insert HTML from text area into message’ if there is HTML in the text field and you want to insert it into the email message for editing or testing purposes.
We will look at this in detail below.
Template Editor(HTML)
The second tool is the HTML Template Editor. It is opened by clicking on Editor in the Template Editor of a template for Outlook (New).
In all HTML Template Editors, first select the document language from the Language drop-down list.
Template creation
To create templates, you now work with both tools in parallel: the primedocs add-in and the HTML template editor.
Procedure
Basically, proceed as follows:
- Create a template for Outlook (New) and configure the template status to In progress
- In the open template editor, click on Editor to edit the template. A new window will open: Template Editor, the HTML template editor.
- In Outlook (New), prepare the desired content, email or signature in the email message.
- Generate the HTML for the text in the email message using the primedocs add-in.
- Insert the HTML into the HTML Content field in the HTML template editor.
- Create the forms and fields required for the template and add them to the HTML Content field: Forms and fields can be called up in the HTML using the syntax {{Name}}.
- Convert the HTML to plain text in the HTML template editor using ‘Extract text from HTML’.
- Save and close the template editor.
- Synchronise.
- Test the template using the primedocs add-in in Outlook (New) and repeat steps 2-9 if necessary.
- Release template and authorise users.
Templating menu (steps 3 and 4)
Example of using the templating menu
The text for an email template was created.
Then, the HTML for the content was generated using the ‘Insert message as HTML into text area’ button.
Creating an email template
The email template is very easy to create. Therefore, we will start with this Outlook template.
Preparation
- Open the tools mentioned above to get started.
- For the template editor: Click on New Template in primedocs desktop and select Email.
- In the template editor that opens, click Editor to edit the template. A new window will open: Template Editor, the HTML template editor.
- In the HTML template editor, first select the document language from the Language drop-down list.
If the template is available in multiple document languages, do not forget to activate all desired document languages in the template editor.
- The subject line for the email template can be set in the Subject field.
- Email addresses can be entered in the To, Cc and Bcc fields, separated by semicolons (
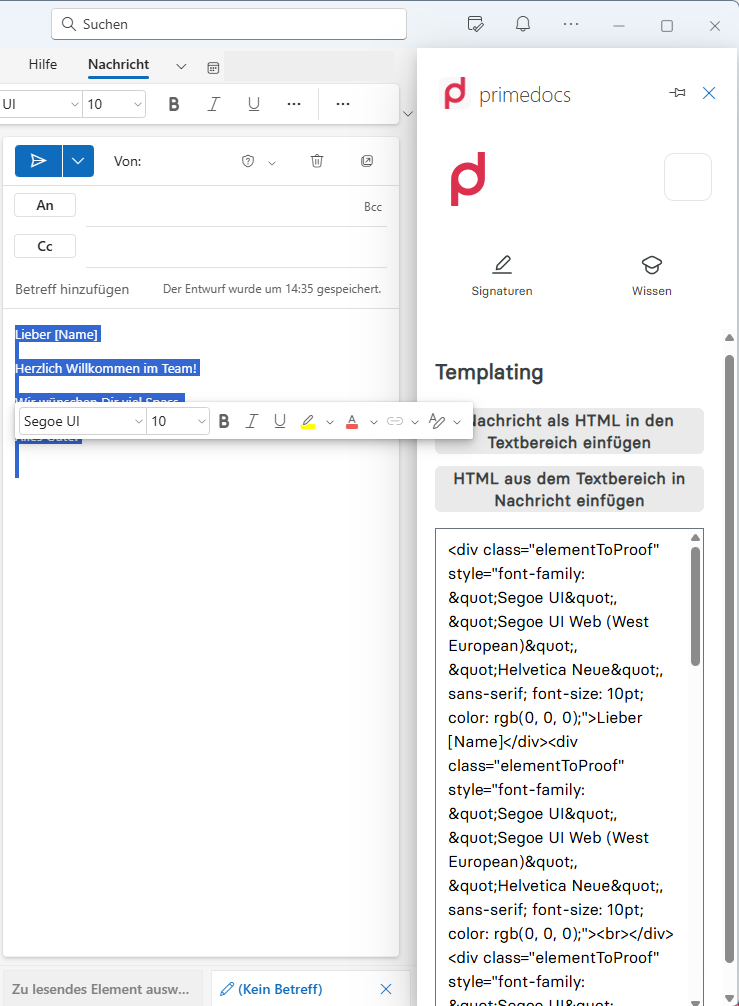
;). - Switch to Outlook (New) and create the desired text. Use the Templating menu to generate the HTML for the text: Word Templating Basics
- Copy the generated HTML from the templating menu.
- Switch to the HTML template editor and paste the HTML into the HTML content text field.
- Click on the
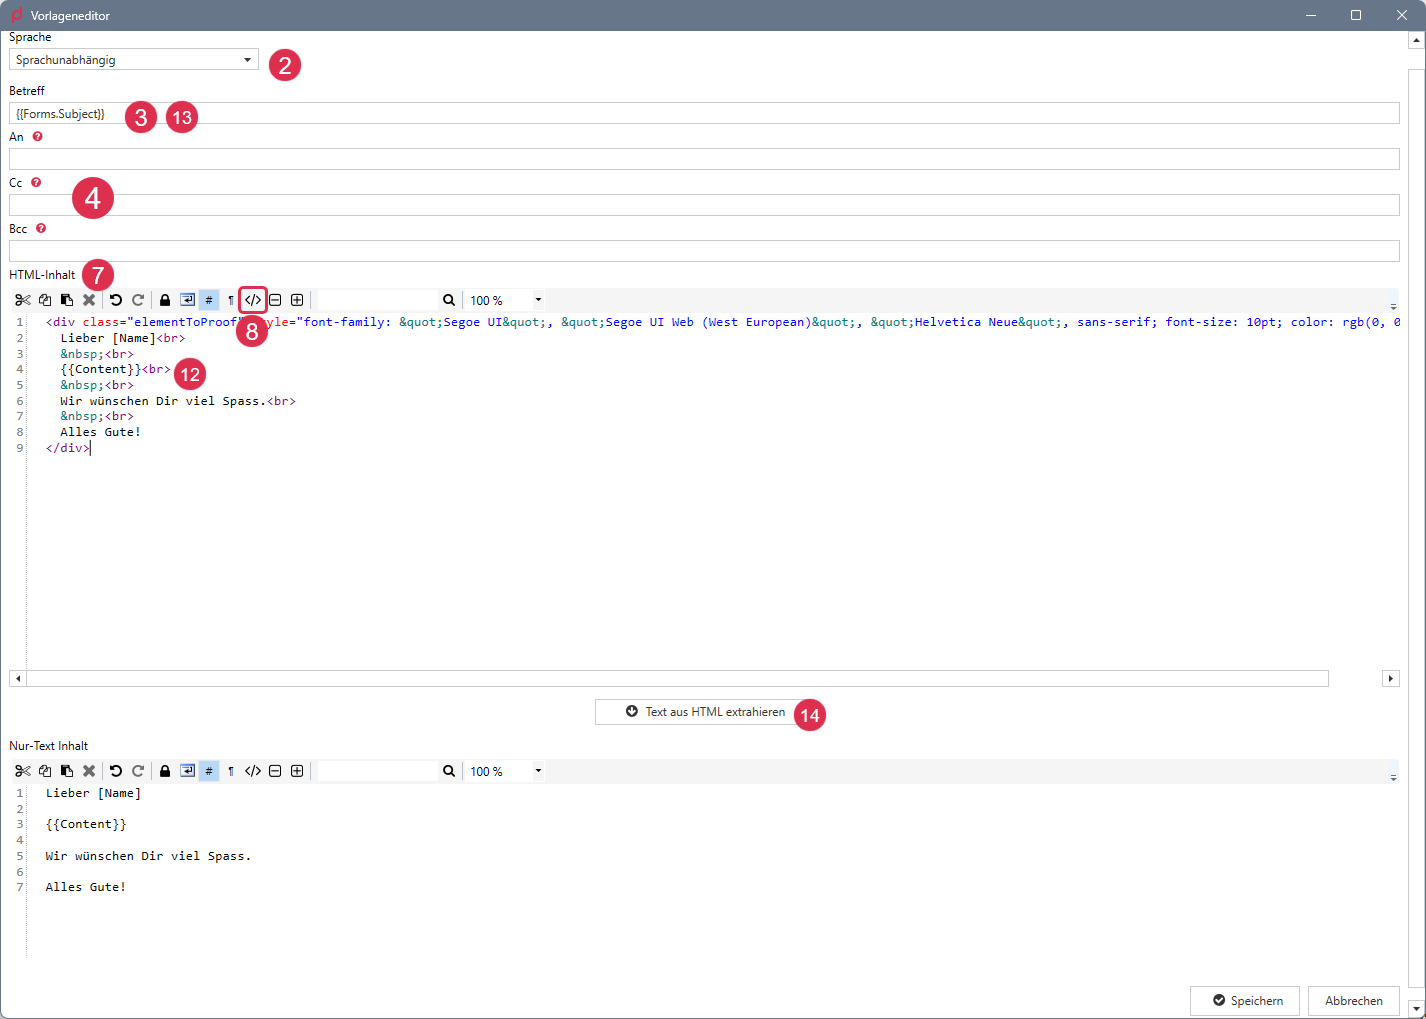
</>button to structure the HTML more attractively. In our example, the HTML looks like this:
<div class="elementToProof" style="font-family: "Segoe UI", "Segoe UI Web (West European)", "Helvetica Neue", sans-serif; font-size: 10pt; color: rgb(0, 0, 0);">Lieber [Name]</div>
<div class="elementToProof" style="font-family: "Segoe UI", "Segoe UI Web (West European)", "Helvetica Neue", sans-serif; font-size: 10pt; color: rgb(0, 0, 0);">
<br />
</div>
<div class="elementToProof" style="font-family: "Segoe UI", "Segoe UI Web (West European)", "Helvetica Neue", sans-serif; font-size: 10pt; color: rgb(0, 0, 0);">Herzlich Willkommen im Team!</div>
<div class="elementToProof" style="font-family: "Segoe UI", "Segoe UI Web (West European)", "Helvetica Neue", sans-serif; font-size: 10pt; color: rgb(0, 0, 0);">
<br />
</div>
<div class="elementToProof" style="font-family: "Segoe UI", "Segoe UI Web (West European)", "Helvetica Neue", sans-serif; font-size: 10pt; color: rgb(0, 0, 0);">Wir wünschen Dir viel Spass.</div>
<div class="elementToProof" style="font-family: "Segoe UI", "Segoe UI Web (West European)", "Helvetica Neue", sans-serif; font-size: 10pt; color: rgb(0, 0, 0);">
<br />
</div>
<div class="elementToProof" style="font-family: "Segoe UI", "Segoe UI Web (West European)", "Helvetica Neue", sans-serif; font-size: 10pt; color: rgb(0, 0, 0);">Alles Gute!</div>
<div class="elementToProof" style="font-family: "Segoe UI", "Segoe UI Web (West European)", "Helvetica Neue", sans-serif; font-size: 10pt; color: rgb(0, 0, 0);">
<br />
</div>
<div class="elementToProof" style="font-family: "Segoe UI", "Segoe UI Web (West European)", "Helvetica Neue", sans-serif; font-size: 10pt; color: rgb(0, 0, 0);">
<br />
</div>
- It is worth tidying up the HTML afterwards. If you do not have the necessary HTML knowledge, please contact primedocs Support.
- This is what the revised HTML looks like:
Text
Dear [Name],
Welcome to the team!
We hope you enjoy yourself.
All the best!
HTML-Code
<div class="elementToProof" style="font-family: "Segoe UI", "Segoe UI Web (West European)", "Helvetica Neue", sans-serif; font-size: 10pt; color: rgb(0, 0, 0);">
Dear [Name]<br>
<br>
Welcome to the team!<br>
<br>
We hope you enjoy yourself.<br>
<br>
All the best!
</div>
- For this email template,
- the phrase ‘Welcome to the team!’ should now be controlled via a Forms selection and thus made dynamic,
- and the subject selected in Forms should appear in the subject field of the email.
Forms (preview)
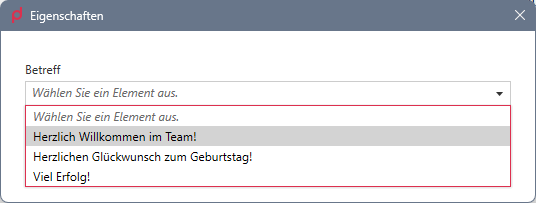
Forms-Code
The configuration contains a choice field, which is displayed as a drop-down list in Forms.
<FormsConfiguration>
  <Elements>
    <Choice Id="Subject" translate-Label="Texts.Subject" Required="true" translate-ValidationMessage="Forms.Info.CompleteField">
      <Option Value="Herzlich Willkommen im Team!" Label="Herzlich Willkommen im Team!" />
      <Option Value="Herzlichen Glückwunsch zum Geburtstag!" Label="Herzlichen Glückwunsch zum Geburtstag!" />
      <Option Value="Viel Erfolg!" Label="Viel Erfolg!" />
    </Choice>
  </Elements>
</FormsConfiguration>
Text field with sentence
<FieldsConfiguration>
  <Fields>
    <Text Name="Content">
      <Code>
        function main(){
          // Variable containing the first part of the sentence.
          let sentence = "We wish you  ";
          // For each selection in the Choice field, something different is output.
          switch($("Forms.Subject")){
            case 'Welcome to the team!':
              // The first part is appended to the second part.
              sentence += "Enjoy getting to grips with it.";
              break; // Exit switch() when a case has occurred.
            case 'Happy birthday!':
              sentence += "All the best on your birthday";
              break;
            case 'Good luck!':
              sentence += "Good luck with your exam.";
              break;
            default:
              // This will not happen because the choice in forms
              // is marked as ‘required’.
              sentence += "[Select]";
          }
          // The variable containing the complete sentence is returned.
          return sentence;
        }
      </Code>
    </Text>
  </Fields>
</FieldsConfiguration>
- Forms fields and fields can be called up using the syntax
{{Name}}in HTML. We therefore adjust the HTML as follows:
Text
Dear [Name]
Content field content
We hope you enjoy yourself.
All the best!
HTML
<div class="elementToProof" style="font-family: "Segoe UI", "Segoe UI Web (West European)", "Helvetica Neue", sans-serif; font-size: 10pt; color: rgb(0, 0, 0);">
Dear [Name]<br>
<br>
{{Content}}<br>
<br>
We hope you enjoy yourself.<br>
<br>
All the best!
</div>
- We set the subject accordingly with
{{Forms.Subject}}. - The plain text is created using the Extract text from HTML button.
- The template is saved.
- Now it is time to test the email template and check whether it looks as intended.
- Finally, the template just needs to be approved for the correct users: Word Dive Into Fields
Create signature template
- Open the tools mentioned above to get started.
- For the template editor: In primedocs desktop, click on New Template and select Signature.
- In the template editor that opens, click on Editor to edit the template. A new window will open: Template Editor, the HTML template editor.
- In the HTML template editor, first select the document language from the Language drop-down list.
If the template is available in several document languages, do not forget to activate all desired document languages in the template editor.
- Now proceed in exactly the same way as when creating an email message (from step 5 onwards).
The biggest difference is in the content of the text, which is usually somewhat more comprehensive in a signature than in an email template.
Example
HTML code and result
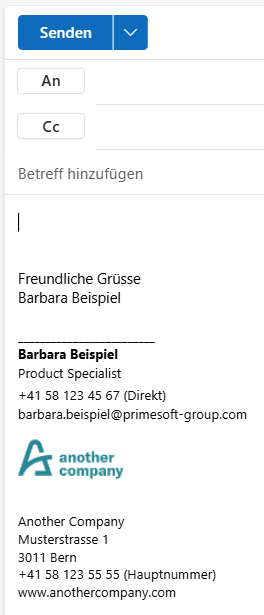
Below is an example of a signature with HTML code and how it appears in the email message:
HTML-Code
<div style="font-family: "Segoe UI", "Segoe UI Web (West European)", "Helvetica Neue", sans-serif; font-size: 10pt; color: rgb(0, 0, 0);" class="elementToProof">
<br/>
Freundliche Grüsse<br/>
{{Profile.User.FirstName}} {{Profile.User.LastName}}<br/>
<br/>
<span style="font-size: 9pt; text-decoration:none">
_________________________<br/>
<b>{{Profile.User.FirstName}} {{Profile.User.LastName}}</b><br/>
{{Profile.User.Function}}<br/>
{{Profile.User.Phone}} (Direkt)<br/>
<a href="mailto:{{Profile.User.Email}}" style="color: black; text-decoration:none">{{Profile.User.Email}}</a><br/>
<br/>
<a href="https://{{Profile.Org.Web}}" style="color: black; text-decoration:none">
<img src="data:image/png;base64,iVBORw0KGgoAAAANSUhEUgAAAKcAAAAyCAYAAAA5vcscAAAABHNCSVQICAgIfAhkiAAADgVJREFUeJztnH90VdWVxz/73PveS0gkEAJYRAZMyHuC44hdaLU6bW2XFWec1nE52PmhHVtF5CVKp/zIA+udpeSBKGgStLSD2nZ1bG07djrq6PijtqD4E6oj+F4SEEVBgVjlZ/LevXfPHy+JLyE/JbSzmvtZK2vl7rPPPt9zs+89955zboRBUpGsm2EjV6vKl0SYpMrbiD7t+bKueUl8M6CDjRkQ0BMyYE/HMbHI2CtB7+vNxYdrGjf95j5+9jNvSNQFDGvMQB1jkdLZfSVme7DvR8/83FXHLisgYIB3zvErVxaNcgsbBSb066z6QTZjn7rNmbvnmNUFDGsGdOcclS244qjEVH1A4RuoPtDFLlJqh/2vD5nCgGHLgJJThL/ratHnU5mWK9M18XtTmZYrVXmqawW9ZMgUBgxb+k/Oa9eGFDm741BB1fcTOI4LgOO4nrJQ897SBWZGF6444XgIDhg+9JuclVOyVwmU5Jlas1bBpi5OWb8ZtDXPEmF08Y1DpDFgmNJ3cjqOMcrcLjbhje2L5+zPNzU71fsR83xXN53N5ZdbQyU0YPjRZ3KOP1hUqGhFvs0XFtPDRLuoLNCu9imTyr8wcmhkBgxH+kzOUWNGfFVEOhNMVfc2LYo/0ZNvqub6V4DdeaYRI0Z6c4ZG5h+GytqGi2PJ+ssmOqtK/9haAsDutcRxDOiqrkZ5re9w+rIinwNaEJrA7Dx2iceHitq6sUbkAnXNa003zXsDQETXgkwssO1zgOf7CRFwnOk1OStGlE4Rj3Fdrf53+wqWrqn6ytDIOv7YYl4EJrvinfPH1hLQM70mp3HNed3Wj/ald0T+87grysdxTNQec6ZYFIvvpt9YMr/zsWHqstVnqBfKNn8nvmW6s6o0Ew6fa6xDv0kvWnTg4/q/tmP21rN88UtcK/zc9sVzPgKILrvzdEXDgmCMmTp12erWpiXzX81vusKpG2kiMsuV8Mbti+e8nV9WWVsf8z1OtMKHX+lsz3HsqaGS09QKZZsXx7dULGs4083Krh3OvPeO5yn6U6bX5ctYbf0WRKZ1HPvKTxoT8a8NKKrj2JUFpdNVrRmW6FR8TkGYoDBWVEcpFInIzlRN/LRe20/WXYjKDxEZ327KKvrTdFvLVTiOH0s2KPAeorWo1AGgvJUNWWdtWzB3TzR510WCWQfSsbJ1SFXXpDMtNbFw2QGEEfnttbbtK4xExjQJMlGVG0BXikgY5SCil6Rqqp4pd1aOC0VGPAY6A8gAqsr96cy+eDnjS0MR733gPUW+D5rwfWY1Len5GT2gf3q8c5Yvu+u0/MQEEOWh3oJU1NVF2M8MY1nnCPo3gs5EpSg3ZU/nJSAAIgigqr1OM52yfG0Jmn0cAVXmq/K/YnhckNnRwsLr03AAIJfs5jKUBYjvIPJndta7bFLy7p+A/zBgKSz0VbYZ/HWI/EulXfoLYLbCOoFxCgtVtWkHZKKdneUGVfmmwG0IJyp8g2vXPhuKZJ8GnY7oReK5r/kSWo9wzbRw2X1tGd5s11QCugThNTHuhwP6KwT0SI9v6yGxLuxiUA4fKsz8Vxeb49gVt9SVx2ob7rAOmUO2ZTYadJXA50GKjkXU9sVzPkrVxMX3MhNd9Z4UIyeKcgQIiY6anK9fLOuaVGLe7SA7ABAtC6v5lOQSszXdtu+OpsS8/xCRdQKWWNbfpxLxhwUOA3iev74xUfVLHMf/uLv+6sZE/EcKj+YsUjZ5gjsGmA6gvpzii30xQlrA+OhXO+oKFAKL04vjMxprbnzpWM7DcKe3Z84uw7cK//7Ot751pOM4dkvdhWqbHwuUwWA2hQ6Qyx+0ojP2bBRhZu7q0d8iZLu7ieqhNxZe1wSgSlbahdi4JTlduqcz6VT2IQro1P6a9z1eztVhf0fnIpZf2NFTEe7O77Ui+XPBbema+MpB9TegR466c8ZqGypVODPfpu1DemVt3fnR2oZX1Tb/3ZGYA0WFtapyuS9yvu/5Zytc2ptv5Yz3zhVhJkDWa5vkFvkXavuF5Hluv6tOrufvAVDk5KhTPyH3u34pJ8R/IndMBsC2rM8ORL9n6cGPj7JTUjVxEd/6c1/k2nRm3+zOfubu8AFDwFF3ThW5UtC8pFUXV9+NJht+CVwifU/ct6A84SsbjHBb/kuH+LipxLyfD0SU+HKE9hS0TWQVh7QIOAKcgOWdBPyur/rNOyNvx6ZknxX4LBF5LJpsaMk9buihtox3f7tbGqhUdEUs2XCdu8vv9eUMoDlRvS9a23CPCHNVQ09Gkw1bVL3zjDKyMjxmvZfhg5xn8JXKUHFUoonqrPxjRbaYkHlM4Cu9JOZ7Cj9W9Iup8nHjU4n41xqXxNeA3tvVTb8wUFHppVWvqOgilE0inIzyjMCdChvEl1BOFxtANub1ZHOuXHfyvTnZVNu+v0RYBRwGHQ36gPjhqTuc+R8CqPg3gT4jypsgreExH6iIeVFhA4b9AGJ0u8IGgS2AphPx6xX9jgh7BGKKbhGff2pMVKU8WjPtmoLJ+yGiy+NiRW3dWEvMboF+h05F3wG5OV0Tv7en8mnLG6Z7yqv5sVzXr2i+qXrbscsOGA50GdYtMUv7S0wFT+G6xpqqf+szcqu8JWE9glDc2ZglS4Crj0VwwPCh+zD913276/Oe8Sc31sT7TkxgqzPvoEK3FSW5YJD6AoYxnck5fuXKIlQn9uSk4IP+a2rT+POaF1W/M+DoGV2Iqtt5LEyodG4f1Ft+wPClc1gf5UZuFpHw0S7qolyXSlStG2zwtFO1K5Zs2AF0zAOGiBQkgWsGUn/i/FWFBePsmI2UZFz/3e033dCUXx69pX4KNlN89Q4dKfBf65iLneisKi0MySTj2x+1ee7vwwXh00Sye9OLbkxPcNaOGGm3nuEifvPS6hcALXfuGWdCrRNcDf3+oCstows4A822NbZ9uLnzcxSQitq6Uy2REz1PDxs309zofHsfQNSpn+CH3HG+hls8d+/egnDZDHyR1Nv2S5MnuGMiYb/cR9ymRPxFQE9ZfuekkG+drEYPNi6u7rKmH/AxBmCy4xQIZkEP5S4ql6Y/QWJ2oqzv1uA3J65aVdhftYoVdROLxoWbbMwmkF+HbasxVlv/QG4rH8SW1Ttiy3ZBnrLEfr6oLbyjIlk3A6AoHLrUMqHNWNwTiYSeMarrxbdfL19+17kjw5mXsKxnbctsjCbrVwNYYfdqy4Q2hy3uLo34G4zqeoP9Yiw8ZjWqwrVrQ9HahntsMVsEedy2zEaJFGyP3brmXADCzLdMaHPI6G0FkbKnEZ7D0mdjUzIrCm1vsohsMPBMdMWKYoCQWstEZIOo+YdPfF6HAQagIFw2qadCVb0slYg/fCwNZIyu7m4rbg2f3Fedsc6aYts3TQInKfoLRK4DzSByRazgU9Mrb62fjZGbQd/PejJJ0bnAWAvzP9Mcp/PuLyJfRuRxclNBtq3WBow8huqz7R5dvhIVuFg8Wa14sxQ8ROJTV6w5P3aKe5EIcwAyEipT5C6BE9ToGroGuAL1H/bRR9oN87MuW1F9XYQCtKD9mVtmKvhtbdnawZ3N4UVuWDfM6WHu+KF0oupXfVWOLav/sopc1GcLucXDw/kT8ir6j8B3eqtSEtJKoADAM3pj86J570Rr63f74Lv+kT1hY92aC6Q/37Z03k7gu7Fkw83AiW649Oy8hcXd6dZ9NbFw2VaE+wU9vL81fFOx3XaaseQFVLt/IboxtTT+AxzHRCNlB4ESg8zIcOD+kBkZM66EIqZtpi9SjAqgJV2r6+ZUorq2/Z9Q7BUo9Gwz2srtObhX1F5cfusdm4AKUX7XMeca0DP2WGdNsarGu62Pv52R0D/3W9uYzwg66K8sRWReRV3dsubq6rYeyy2KOy4WXyMHAPIvlGiyYUx7oH0dto61dSMyTrXT9i6O45OsPwiCKt4udmfKZfRh0y4kv11V9gLgOD619YoIKCONjjgJvPvUyFkgm/FlDwLSrT7IdoCQZfmSxUMgYmWlzQs9HbEA9DO2FanKbUqRJwd73oYbZqTtni7Q5UVI4e6OjbnHBaXUHOSsXkWJeb/j95BkpvLgg1Y0Wf9gLFn/eOXyur8Q5fVcqZwOgOPYCCMBXNU3jkHY9GmOEx6/cmWRSG4lyve9nRbybRE5S+HRVE3806L6w/Z+dE/uHtcu31waf0ul4x9P6NcV9T28H3xyncMDEzLWX+UbVDji7fLvPO4NIxf3VpZedH0aeEhB8fltdNv7OwS5HJXz/FbeBJao6ofApdFk/aOxyJhtAiWq/oPNieqtn1STiEzyImXPjXYLfwUUAQf8cOhRQTo2fZwfSzbcrCK5xwohMtDYnvoLFHxBxqK8fCw6hwsG4YvAjo4fVf1Rc33Pw213VPwP8+sO6kekz7X2VE38MoHlIOHc7nTdDcxodqr3pxLxlraMORXYIsgskEkgd6QT1VcMRHev/YGnRPQJ4ALAFcv79LYFc/dYmYyjkBY4QZF5vsrfAqjqiL4jfsyBlrZGQY8ACPLTY9E5XBjyrZhDTUVdXaT1A7foHfbvz5tz7GSas6Z46y67je/NOWq/50CprK1fbESSCo+la+Kzpjlrirey93D+BmQcx0ymZOQOZ/5HDHrrkUps2V0XqrEfEbA8THlTzfXbP6ne4cL/++T8Q9A9OYcydiy5ejKE3uw0qC5IJapuH8o2/lTp/bv1YYSoeUHxb1eR9FDH9tu8gyYSul/hfVX/kcZE9YahbiMgICAgICAgICAgICAgICAgICAgICAgICAgICAgICAgICAgICBgIPwftp6jEHfIXvEAAAAASUVORK5CYII=" alt="AnyCompanyLogo" width="167" height="50" style="width: 167px; height: 50px; min-width: auto; min-height: auto; margin: 0px; vertical-align: top;"/>
</a><br/>
<br/>
{{Profile.Org.Title}} <br/>
{{Profile.Org.Postal.Street}} <br/>
{{Profile.Org.Postal.Zip}} {{Profile.Org.Postal.City}}<br/>
{{Profile.Org.Phone}} (Hauptnummer)<br/>
<a href="https://{{Profile.Org.Web}}" style="color: black; text-decoration:none">{{Profile.Org.Web}}</a><br/>
<br/>
</span>
</div>
Result
Explanation of HTML elements
Now we will explain the individual elements:
| Element | purpose |
|---|---|
<div></div> | A structural element that contains text or other content. |
<br/> | HTML does not recognise unprotected spaces. Therefore, it requires a protected space followed by a line break <br/> for an empty line. |
<span style=""> | If the formatting of a paragraph changes (as here from 10 pt to 9 pt), it makes sense to configure this with the span tag.The formatting is specified with the style attribute. |
<a href="" style="" /> | The a-tag opens a link. In this case, it is an email link.The href attribute is the actual link stored. The display text is defined between the start and end tags.Since links are often formatted differently, the different formatting is defined with the style attribute. |
<img src="" /> | The img tag allows you to display an image from a Base64 string.As shown in lines 13-15, a link can also contain an image ( img). This creates an image with a link. |